Updating the RoboRio
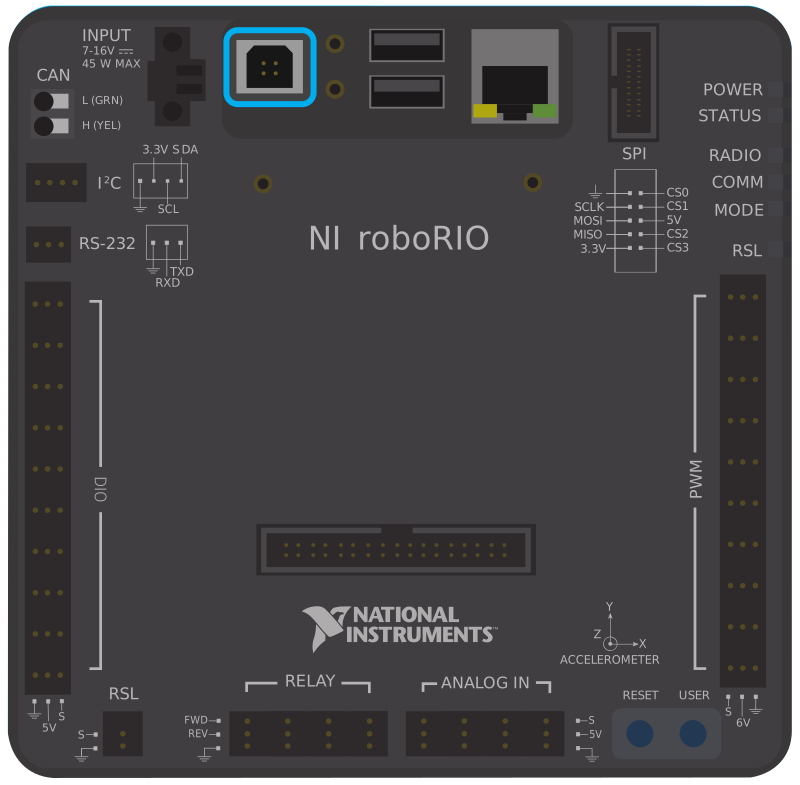
Begin by pluging in the printer cable into the RoboRio located here and plug the usb end into the
computer
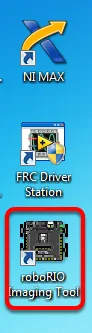
Then open up the roboRIO imaging tool
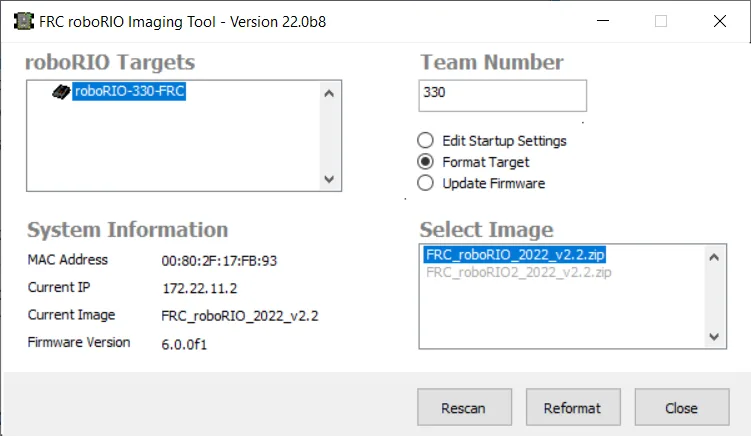
This should then pop up a GUI that looks like
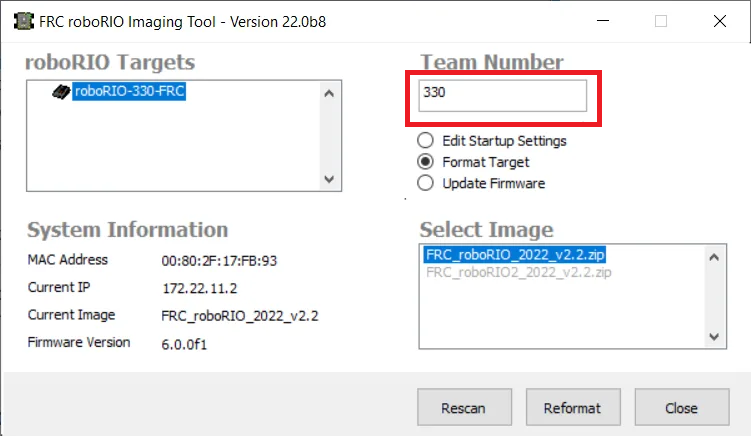
Type 2611 our team number in here
Then make sure that Format Target is selected
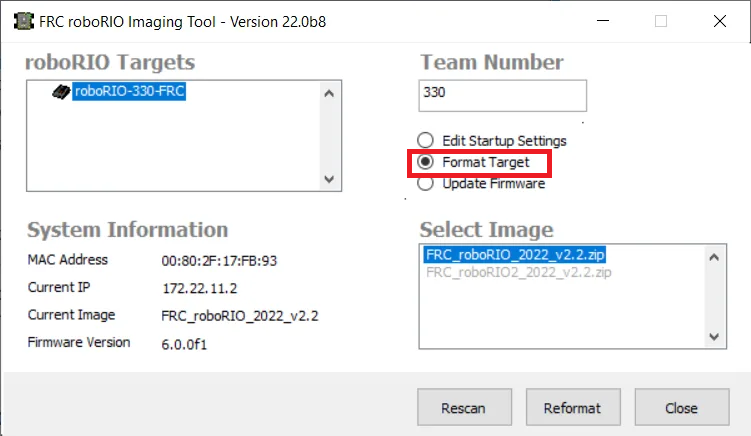
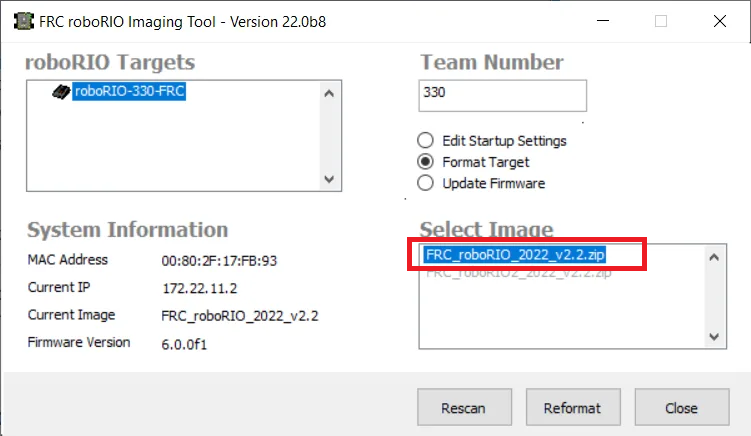
The selected the most recent image for this photo it FRC_roboRIO_2022_v2.2.zip but for you it might be
FRC_roboRIO_2025_v2.2.zip or something like that
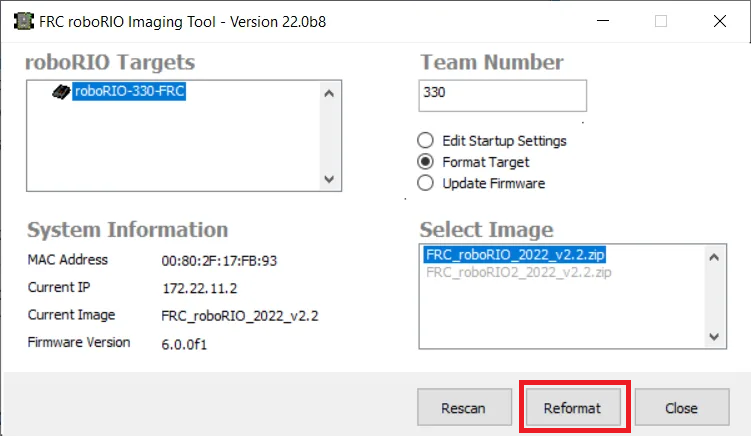
Now before you click the ReFormat makes sure it is plugged in securely and make sure the RoboRIO and the
computer are in a spot where they wont be moved. Once you have everything setup click the ReFormat
button then walk away and make sure no one comes near it. These steps our to ensure that the installation
go successfully as if it gets unplugged you will brick the RoboRio. Also be patient as this could take up
to 10 minutes or more
How to Create a Project
First open up WPILib VS Code there are many way of doing this you can search for the app or by going to
the home screen and clicking on it make sure you don't click on the WPILib Documentation page
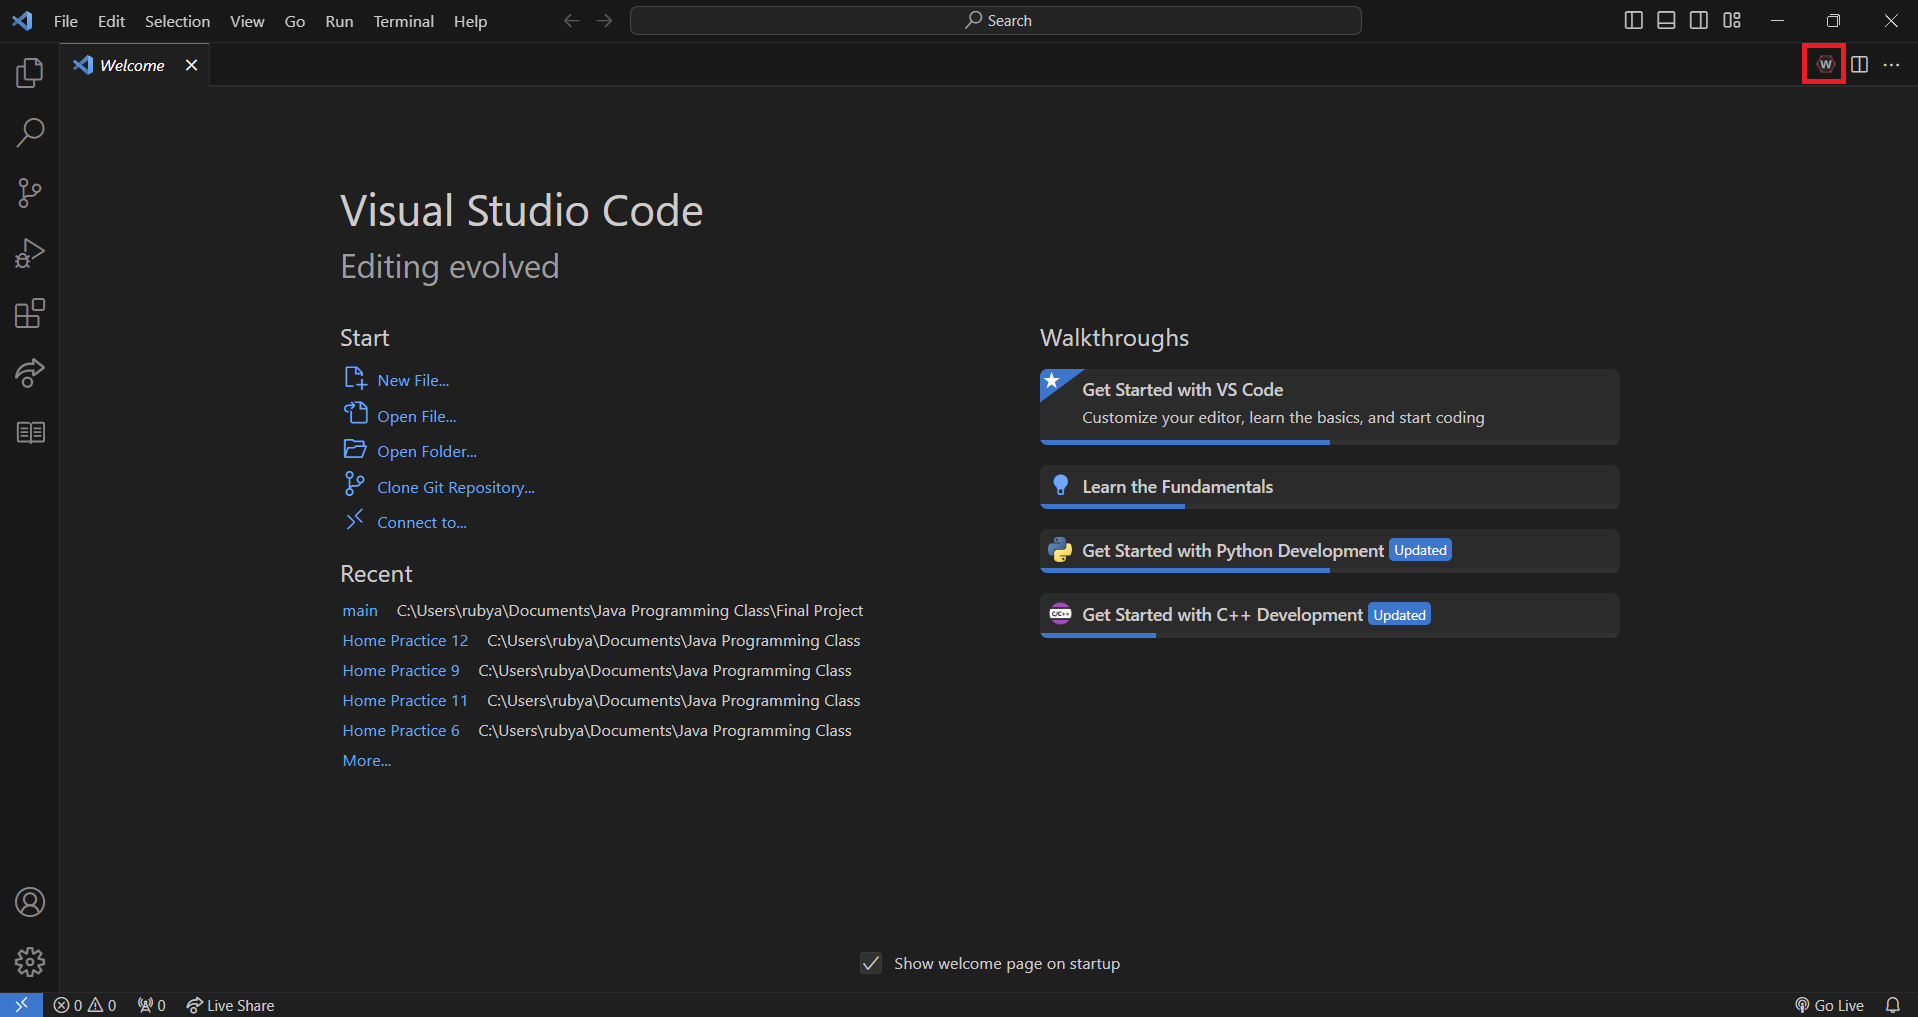
Once you have vs code open it should look something like this
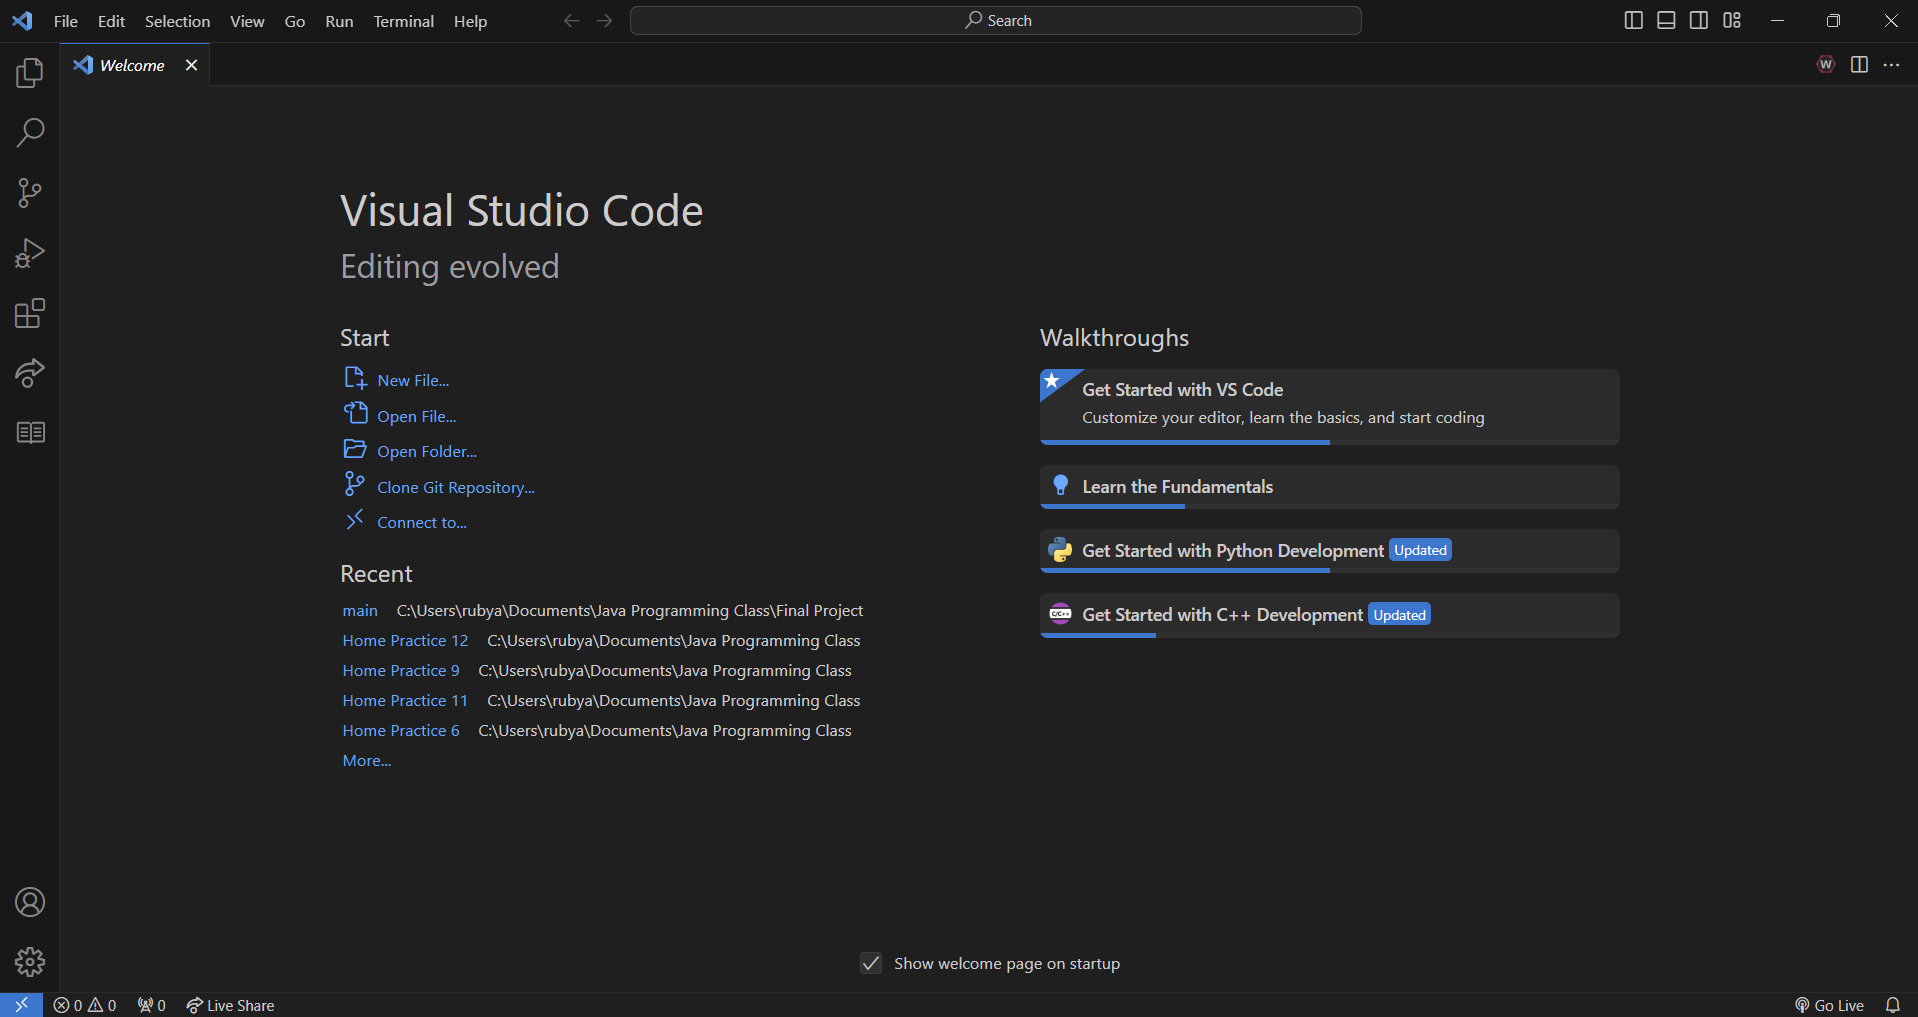
Now go ahead and click on the W logo in the top right part of your screen
If done correctly you should get a screen that looks like this
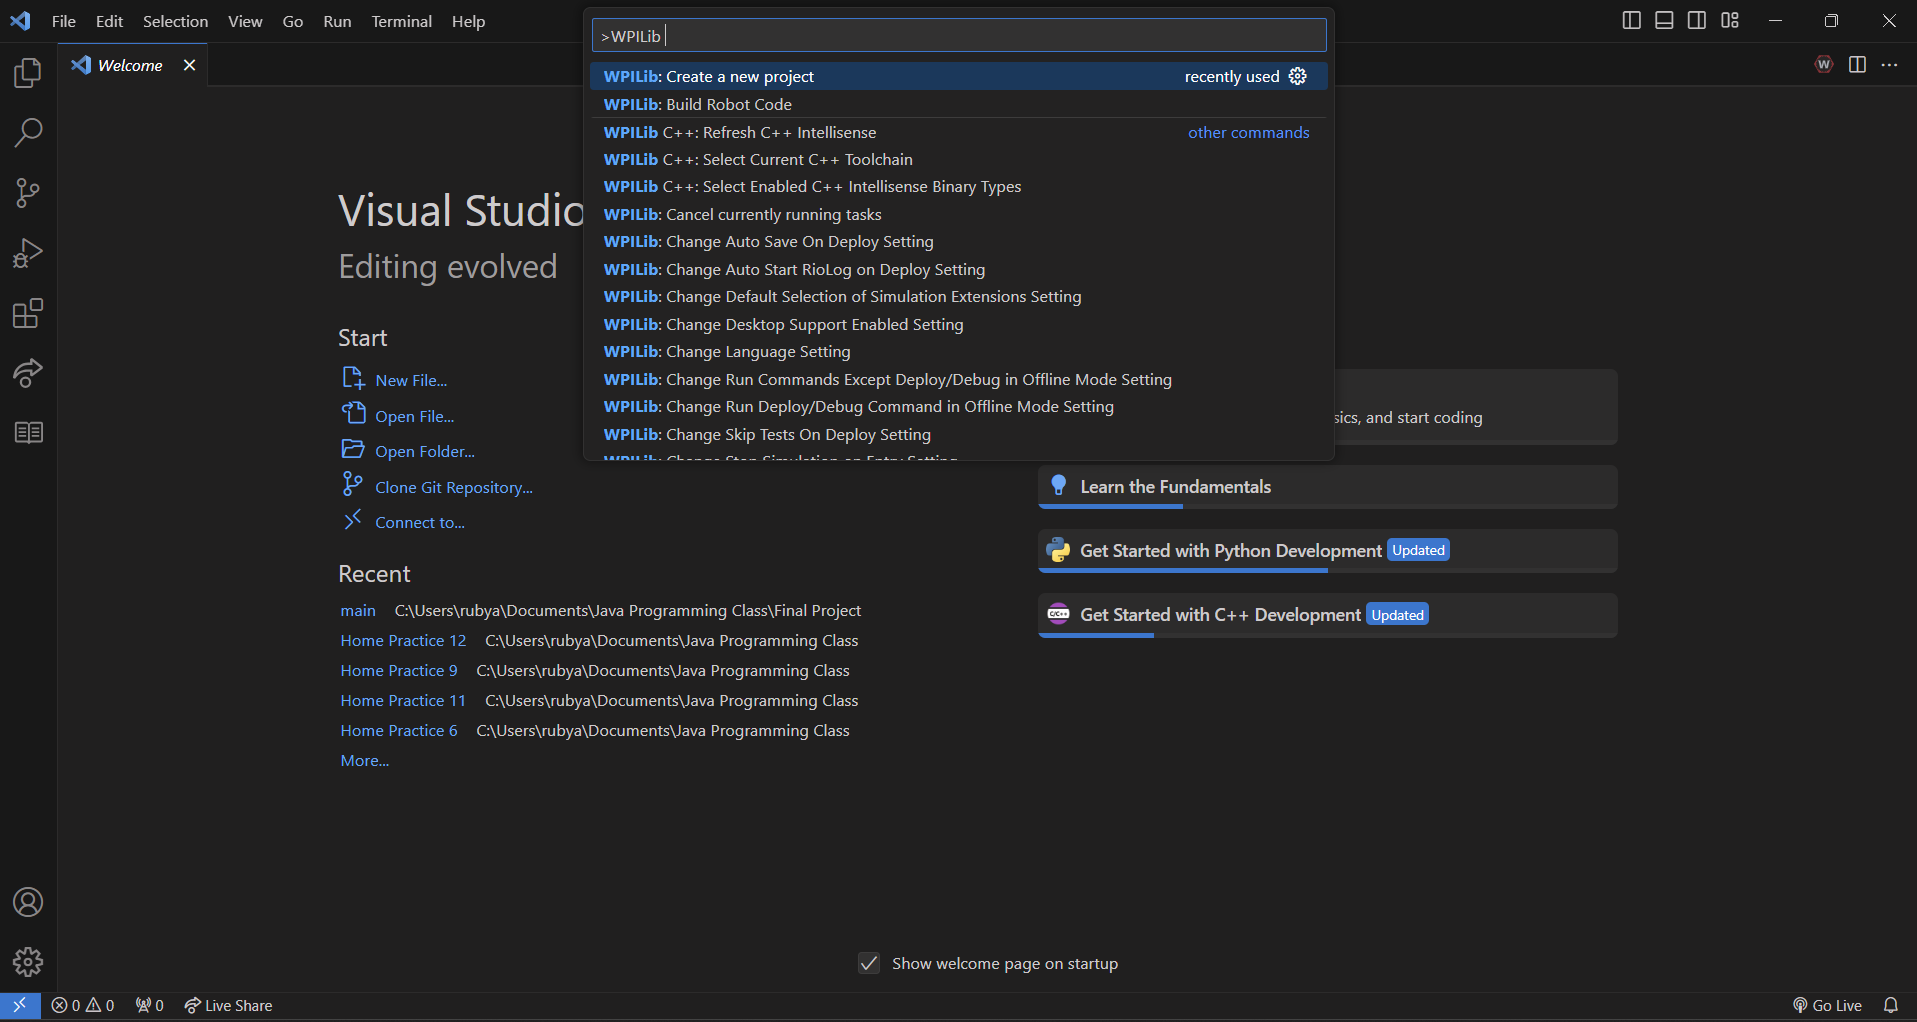
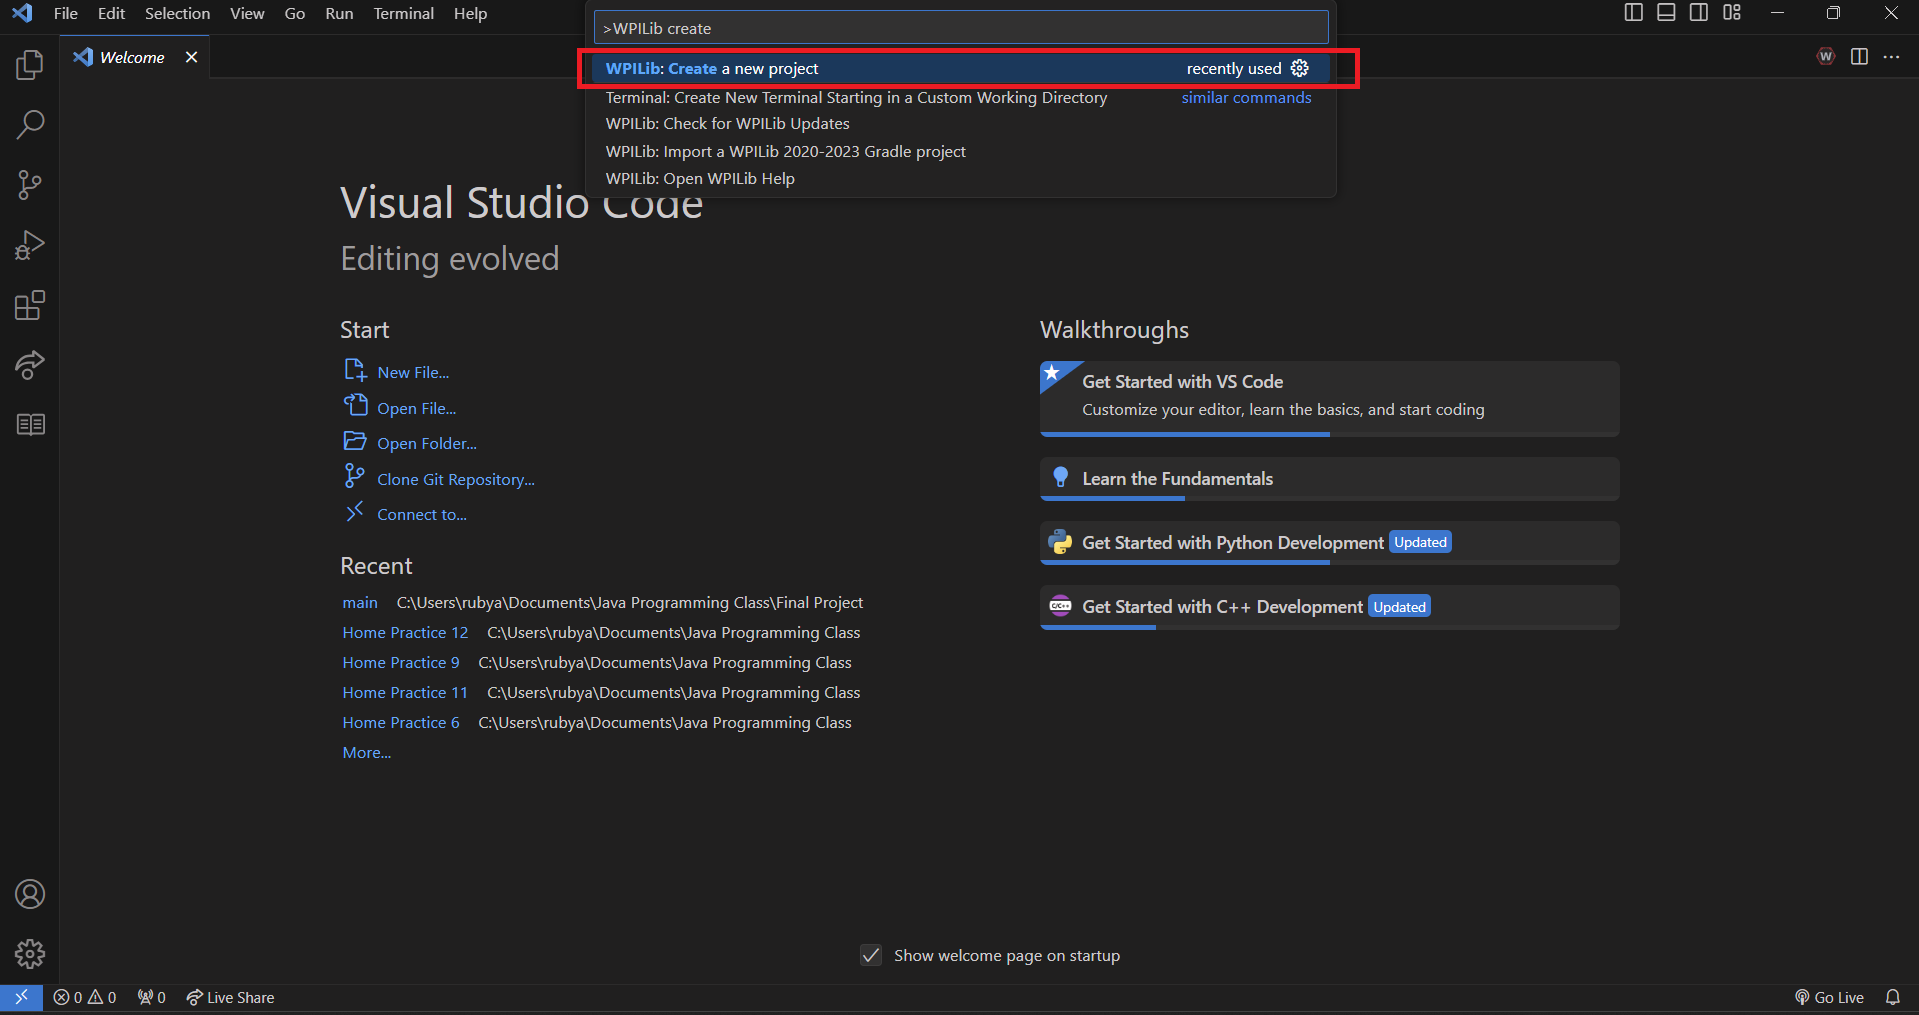
Now search or just click on WPILib: Create a new project
It should then pop up a menu that looks like this
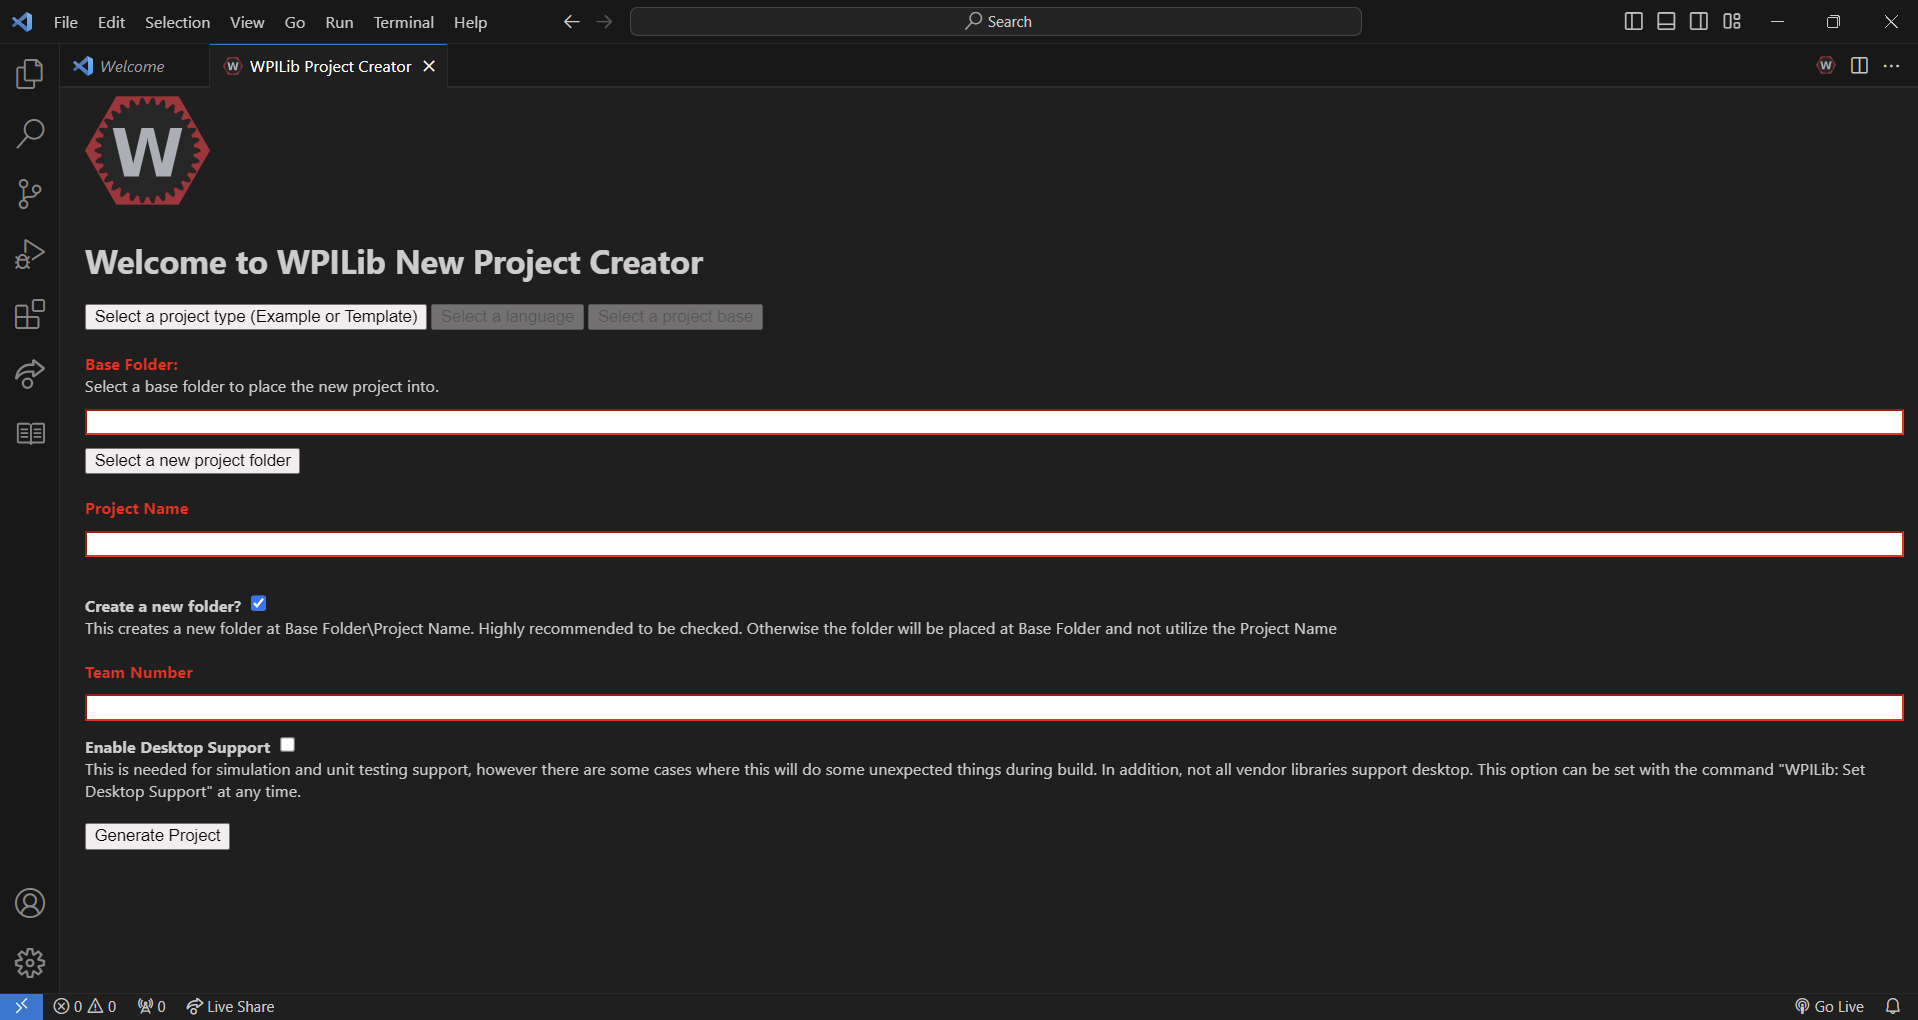
Now click on the Select a project type then hit the template option in the pop up
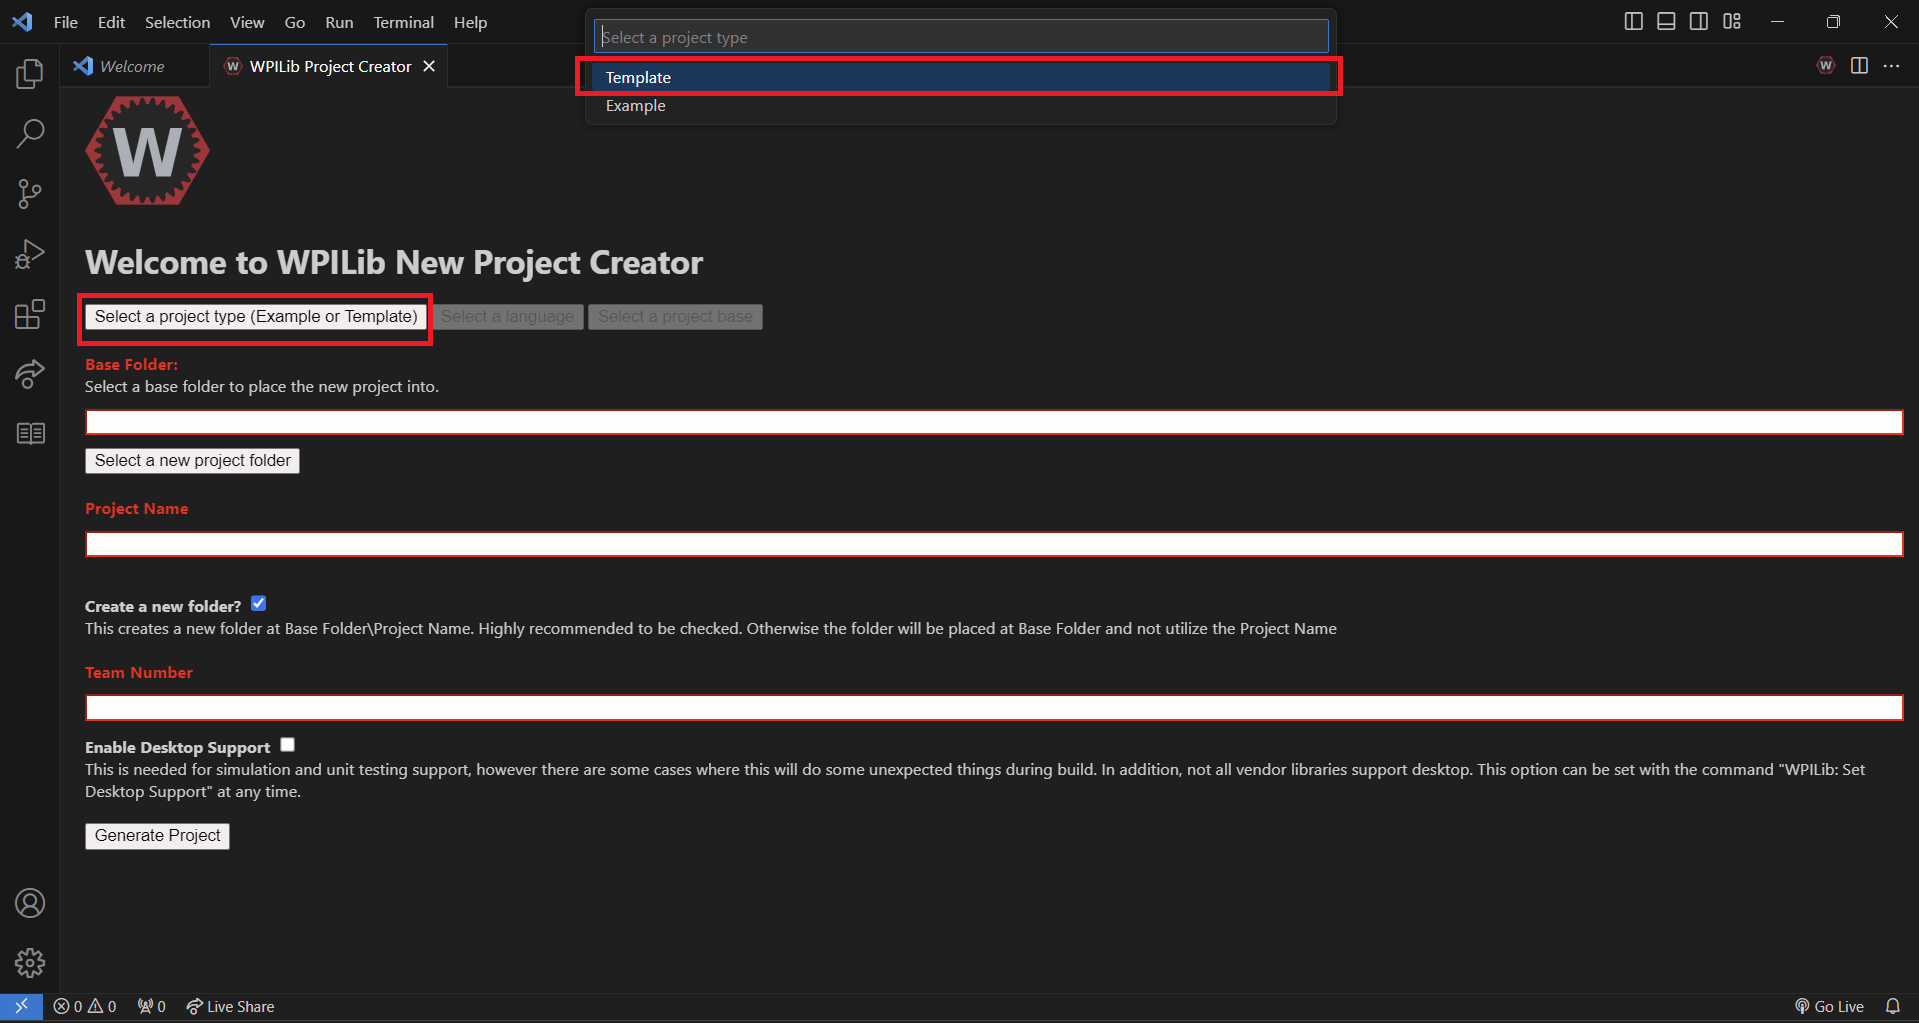
Then click on the java option
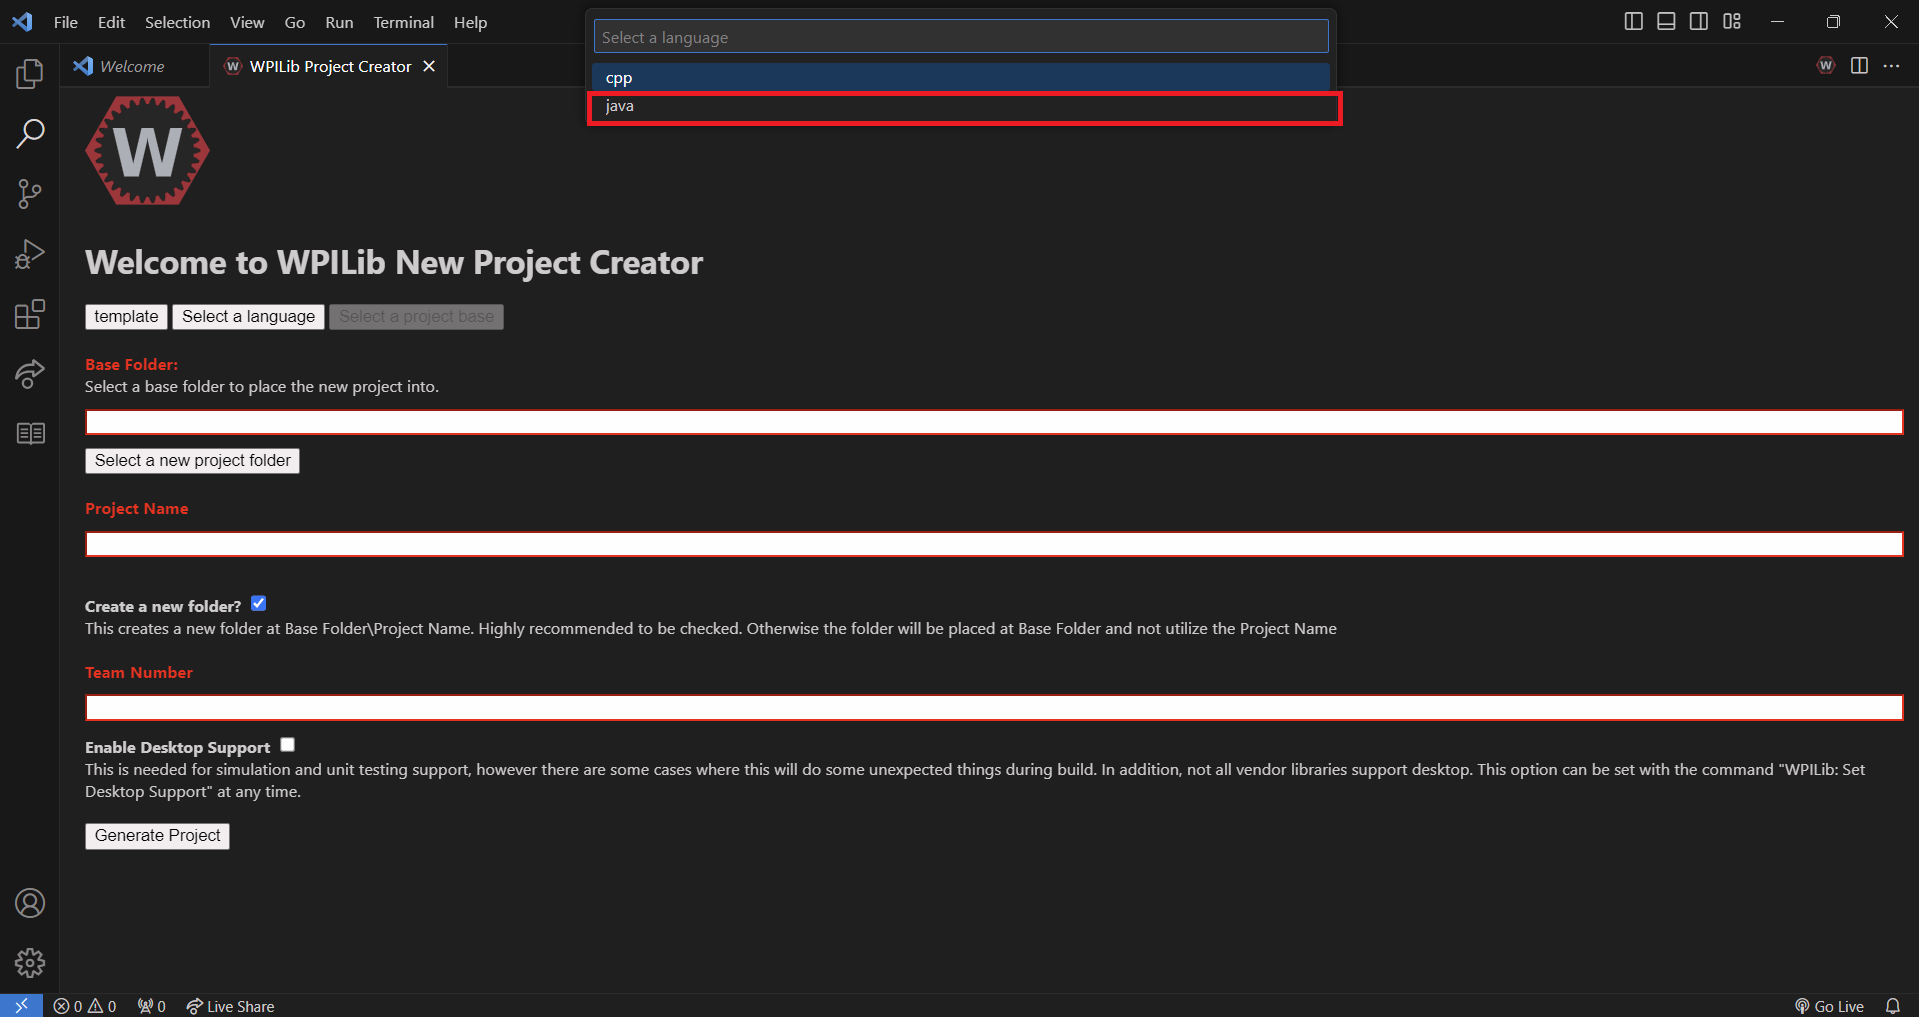
Now click on the Command Robot option
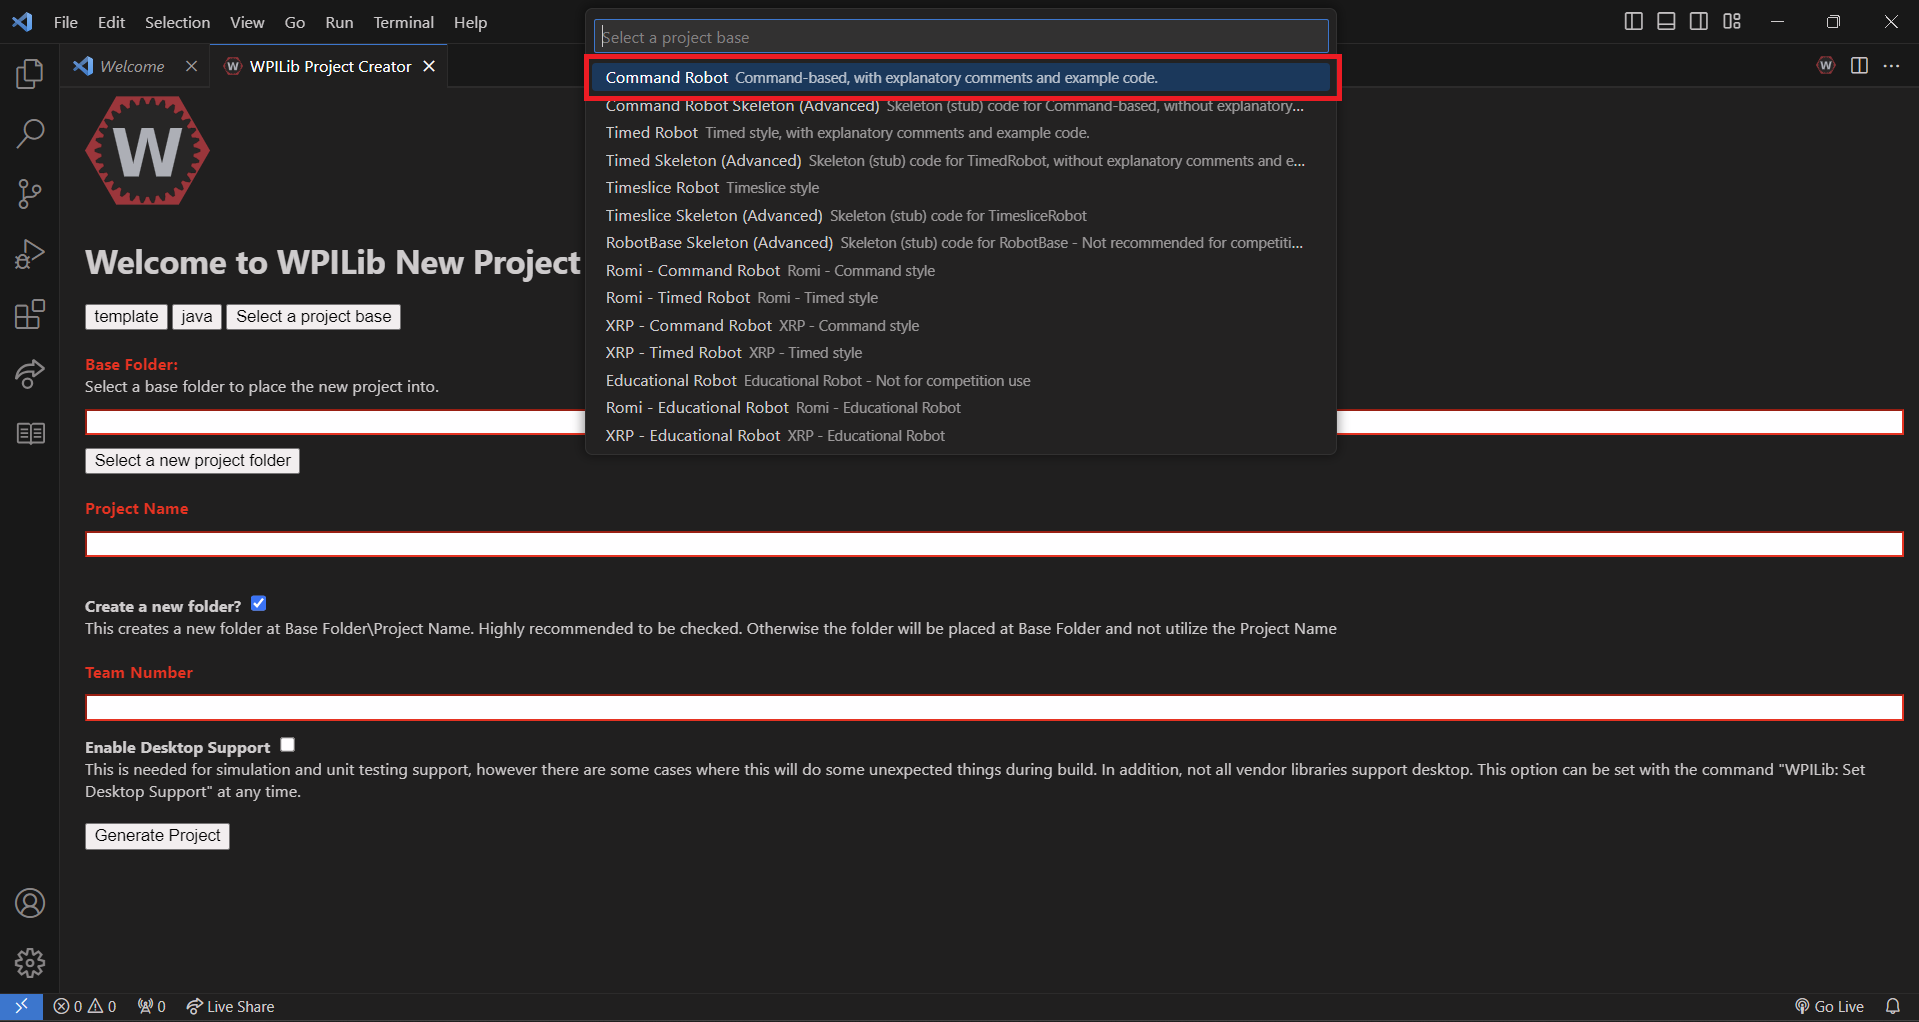
Now hit the Select a new project folder and pick what folder you want you project to generate in
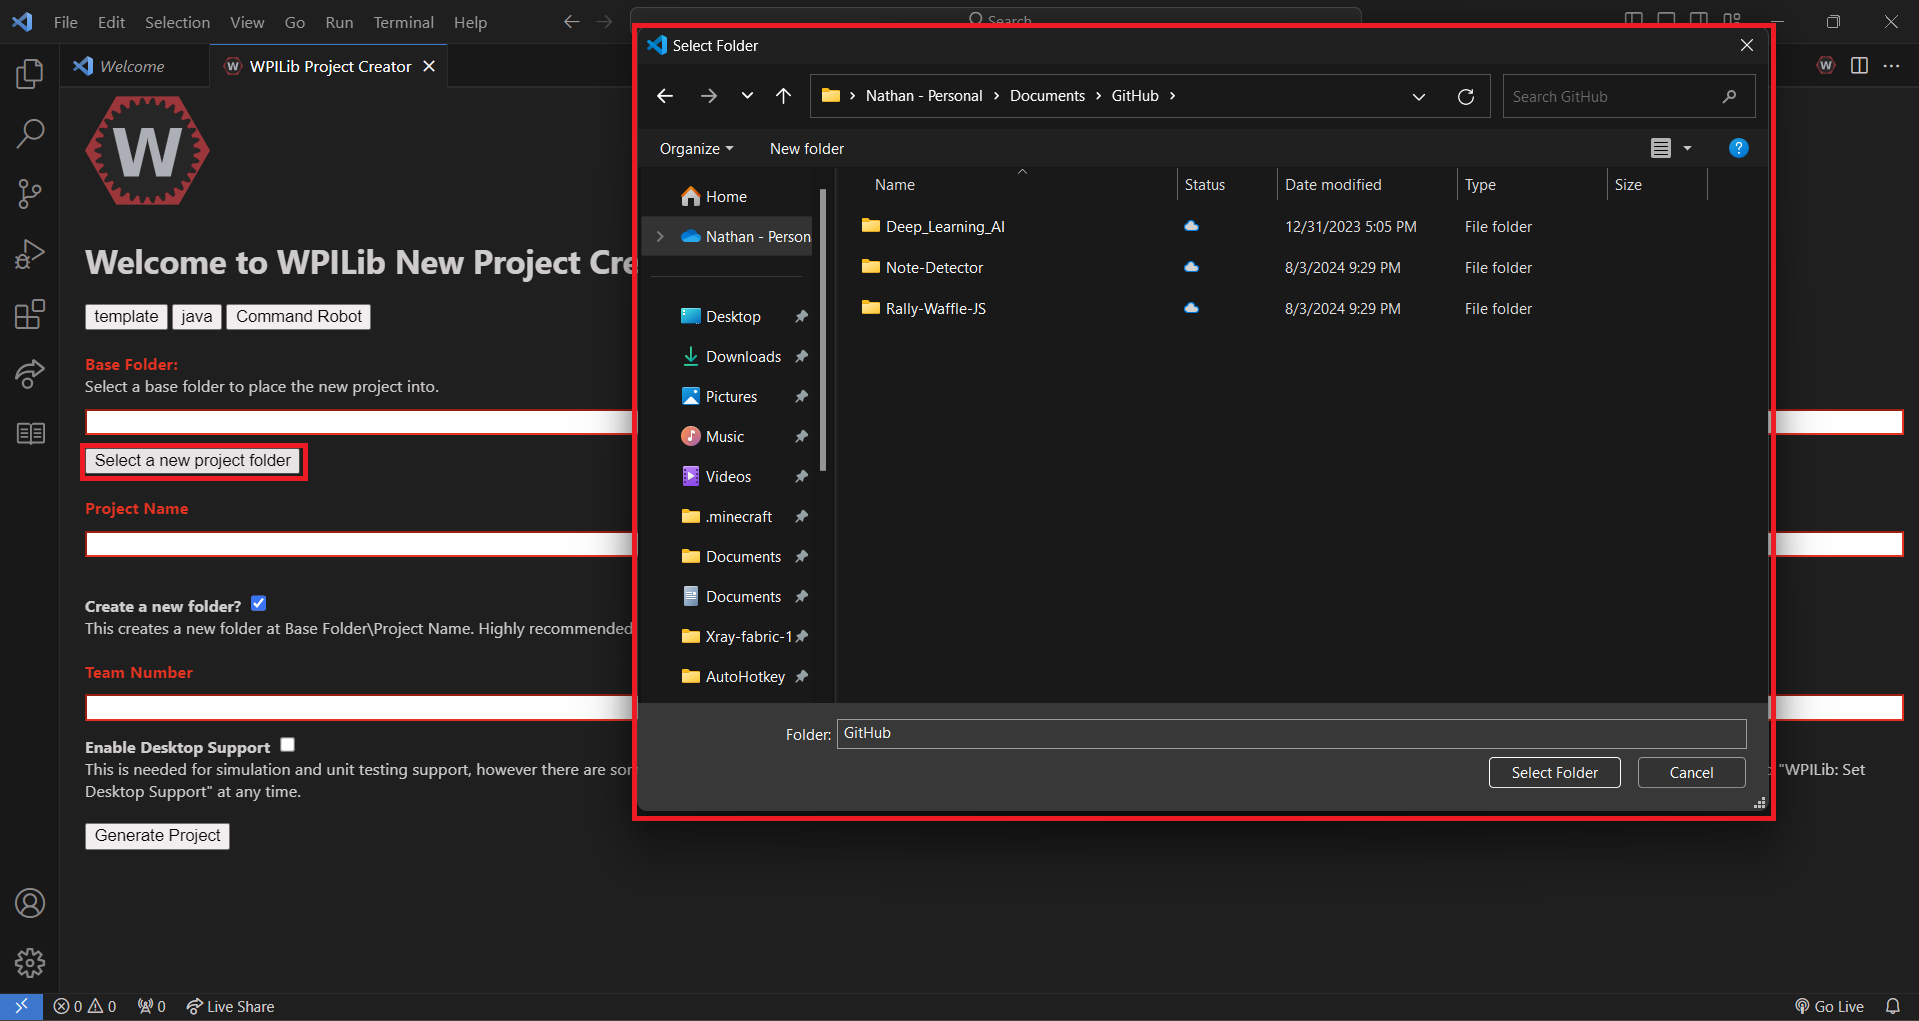
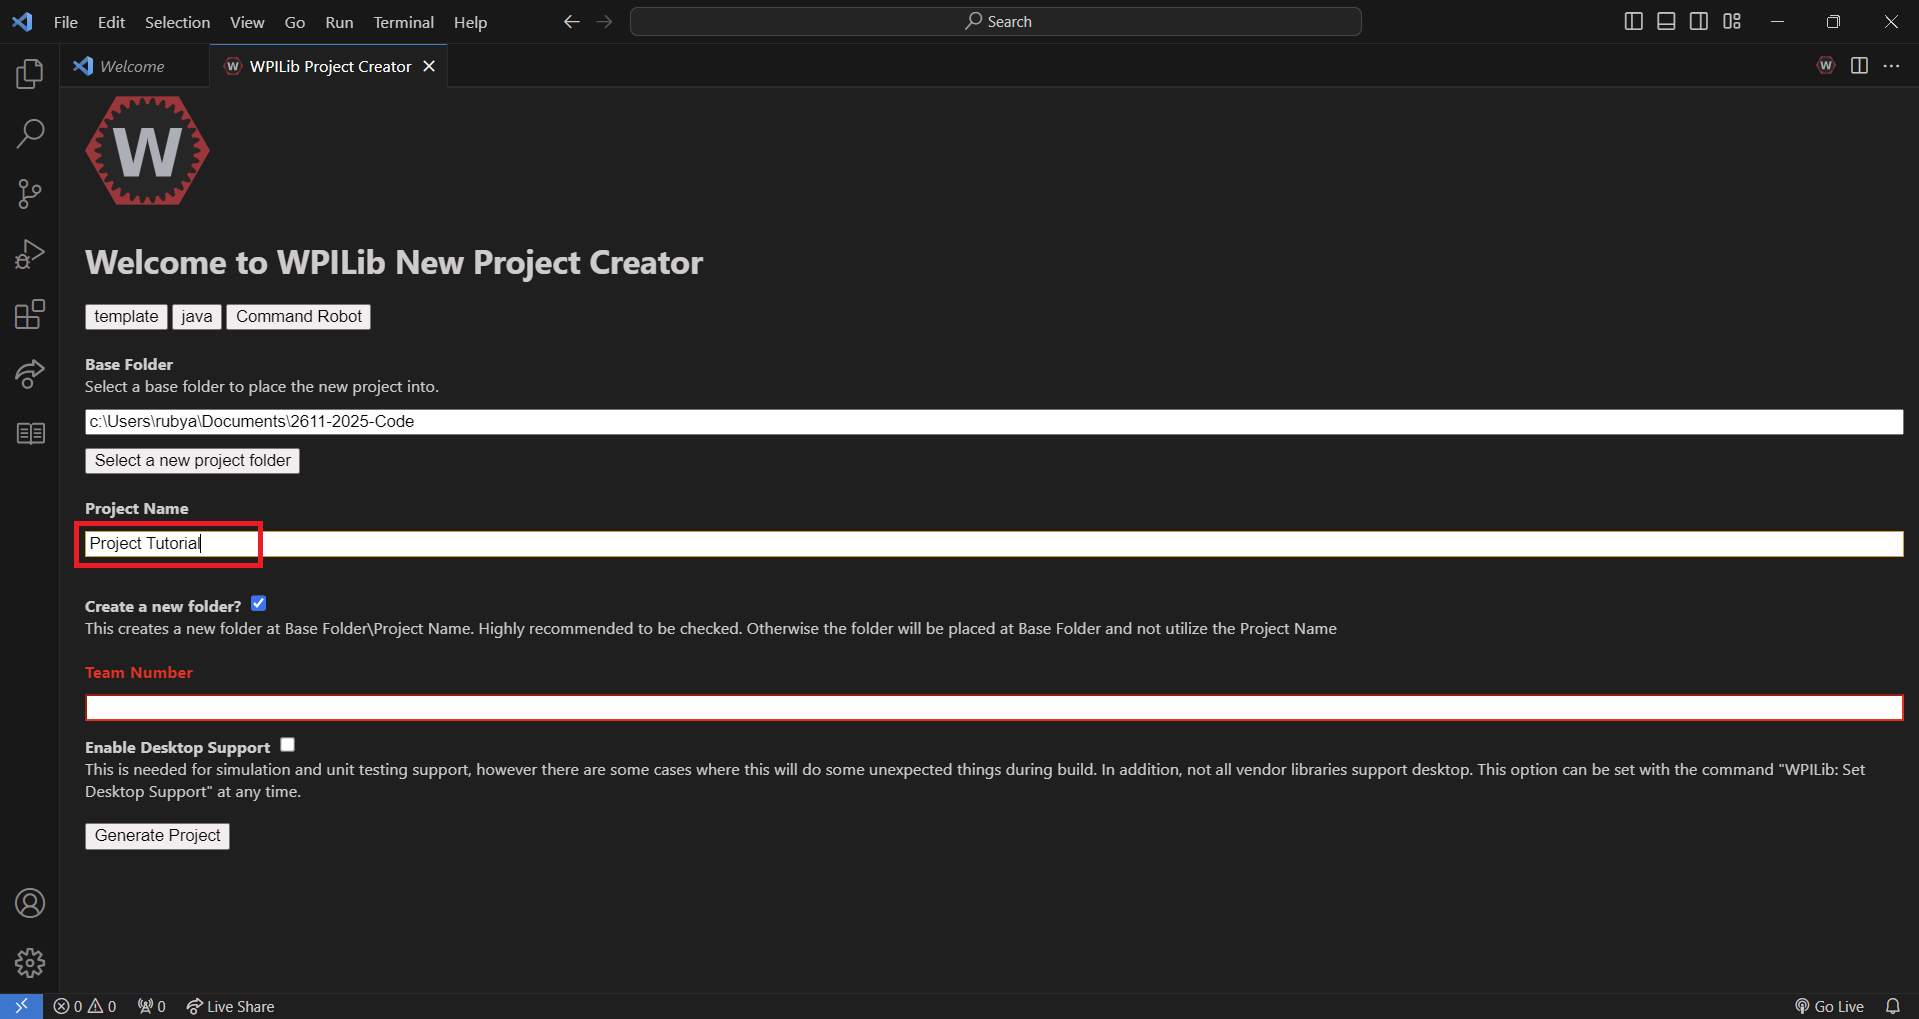
Now type a name you want your project to be called
Now type 2611 in the team number options then click Generate project and hit either Yes(Current Window)
or Yes (New Window) and then your done
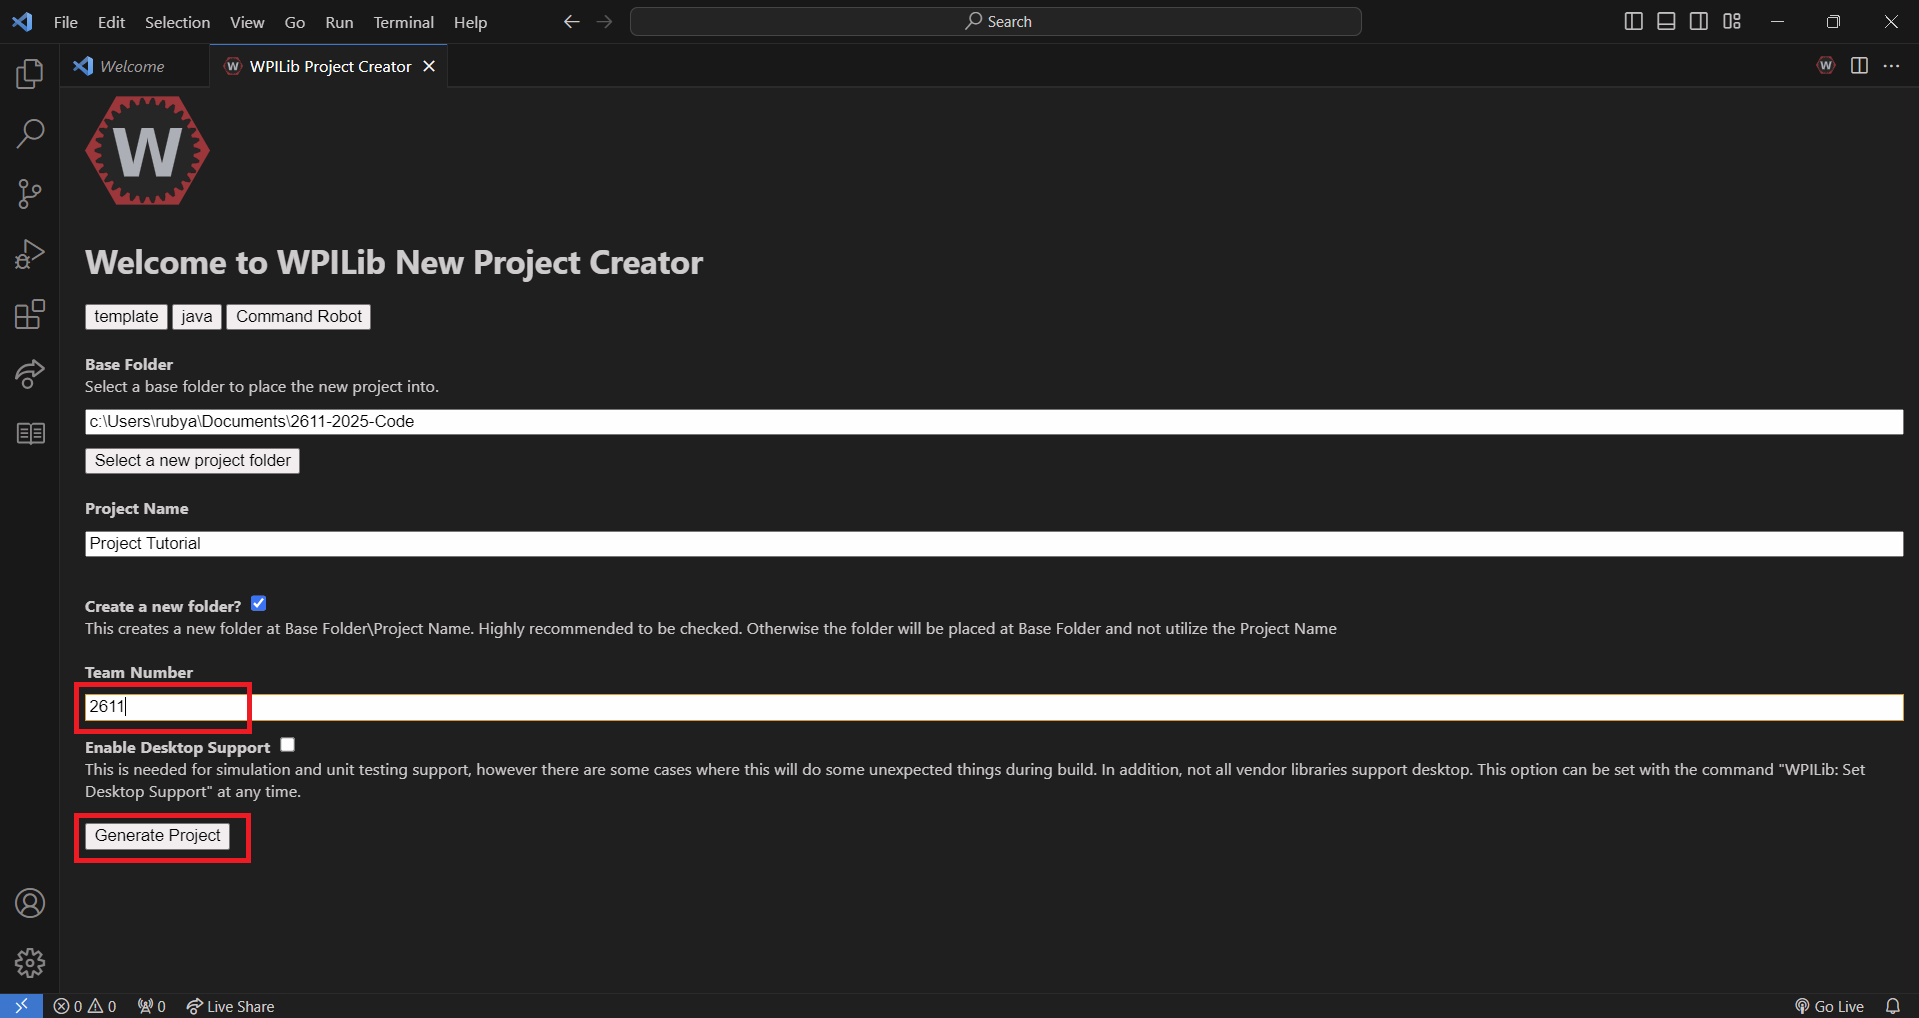
Then wait for it to finish building and then your done and you ready to start programming
How to Install Libaries
Now last season we used a total of 4 libaries (5 if you include WPILib), these were PathPlanner (for
automated paths), Phoenix6 (for CTRE products), REVLib (for REV products), and Photon Vision (for april
tags and other vision related stuff). Now installing libaries is made straight forward in FRC as all you
need is a link to the libary that ends in .json. Though finding this is usually the hardest part but I
will provide you all with the path here. Keep in mind though you might need to tweak the url depending on
year
or version
- PathPlanner
https://3015rangerrobotics.github.io/pathplannerlib/PathplannerLib.json
- Phoenix6
https://maven.ctr-electronics.com/release/com/ctre/phoenix6/latest/Phoenix6-frc2024-latest.json
- PhotonVision
https://github.com/PhotonVision/photonvision/releases-
https://maven.photonvision.org/releases/org/photonvision/photonlib-json/1.0/photonlib-json-1.0.json
- REVLib
https://software-metadata.revrobotics.com/REVLib-2025.json
Now still trying using the json link for PhotonVision but if the build or deployment fails due to
PhotonVision uninstall it. Also I am using the code from 2024 in the background so don't work about that.
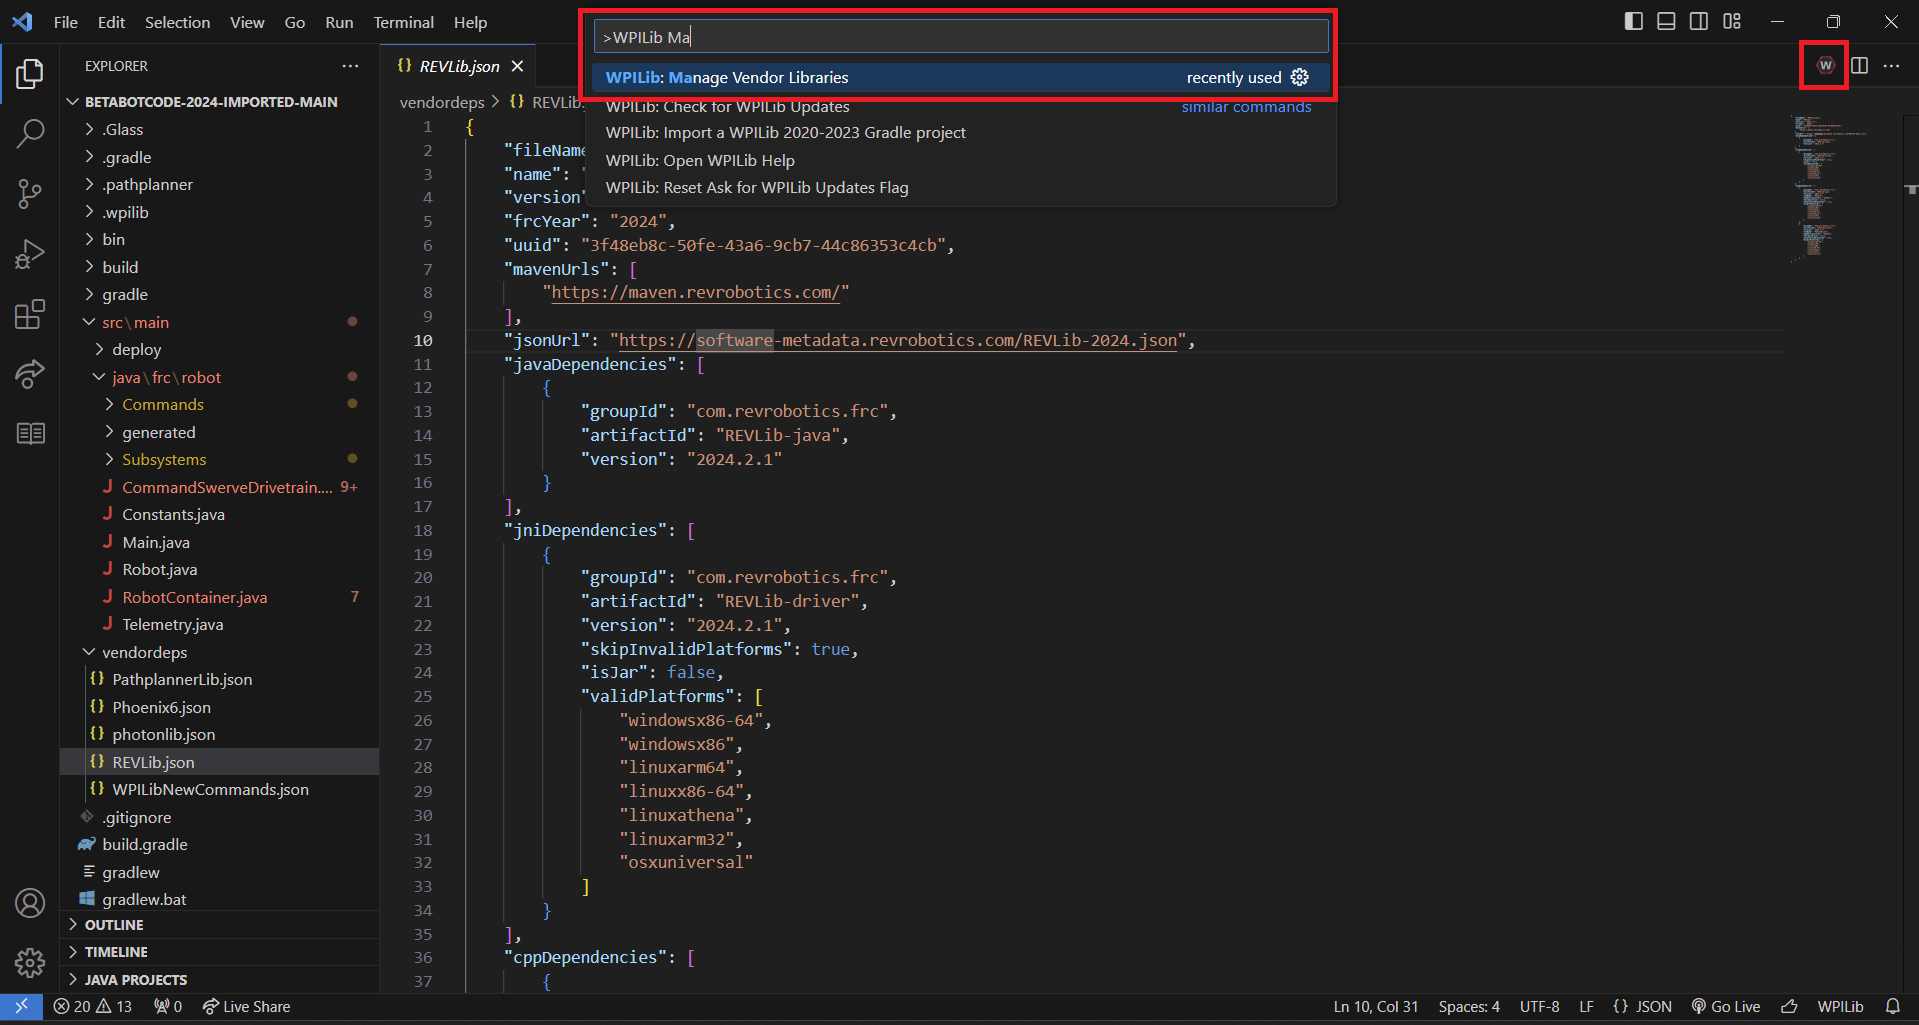
First open up WPILib VS Studios and click the W icon in the top right, then search for manage vendordeps
and click on it.
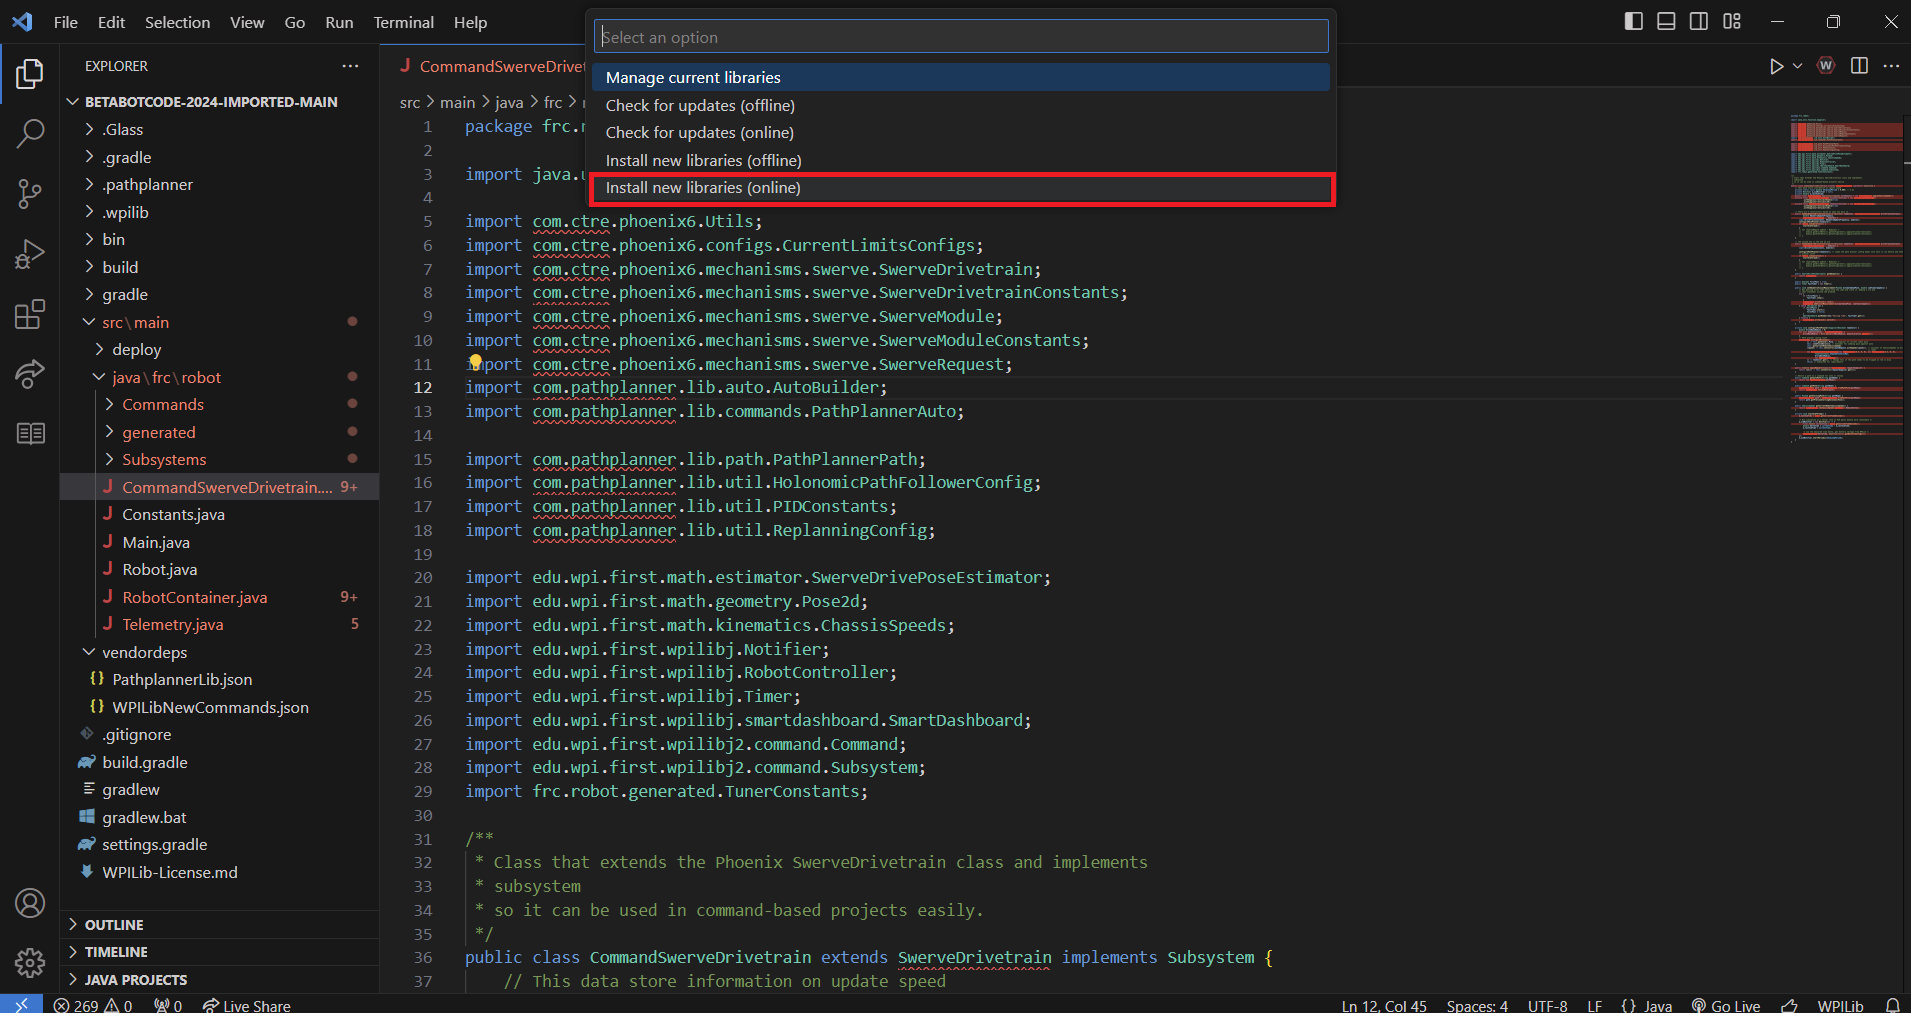
Now click on the Install new libaries (online)
Now copy and paste one of the .json url up above and paste it into the text box and hit enter.
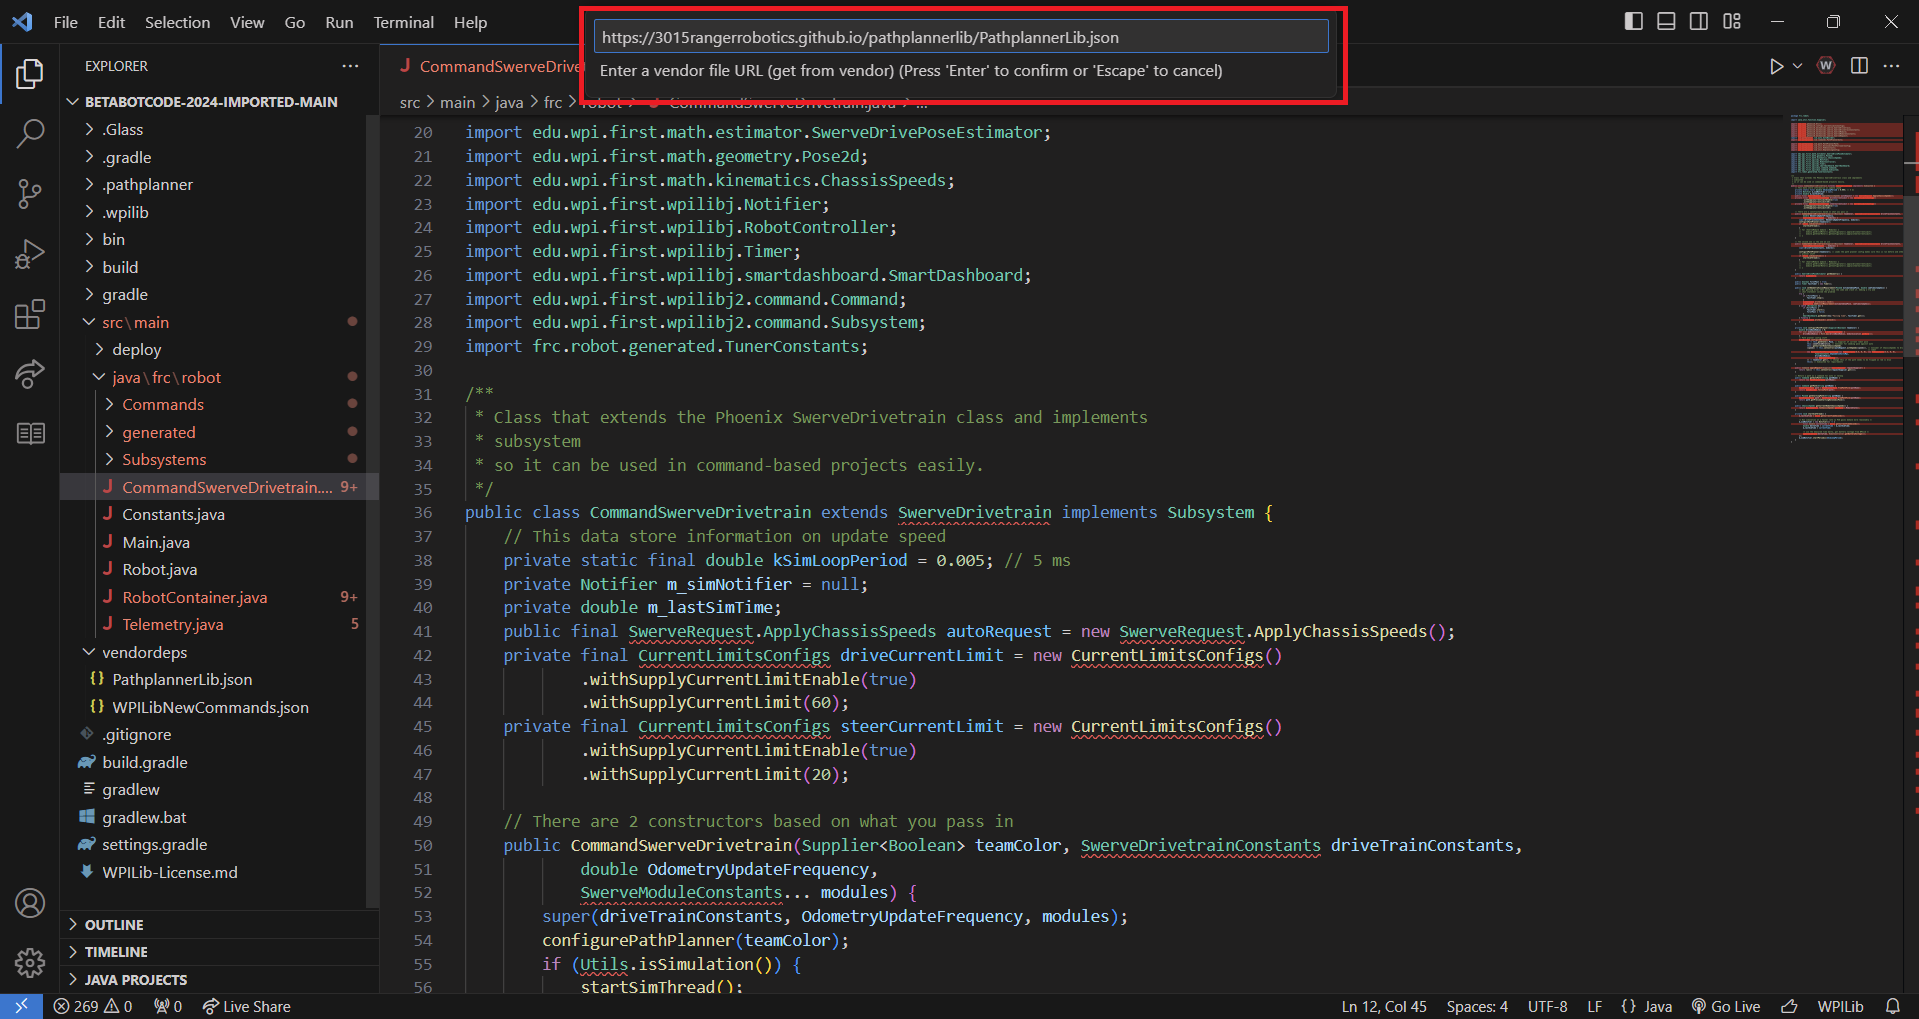
Now you might of got an a message at the bottom that says libary already installed and if you get that
just ignore it for now and continue with installing the other libaries. If it goes well you should get
this pop up and click on no.
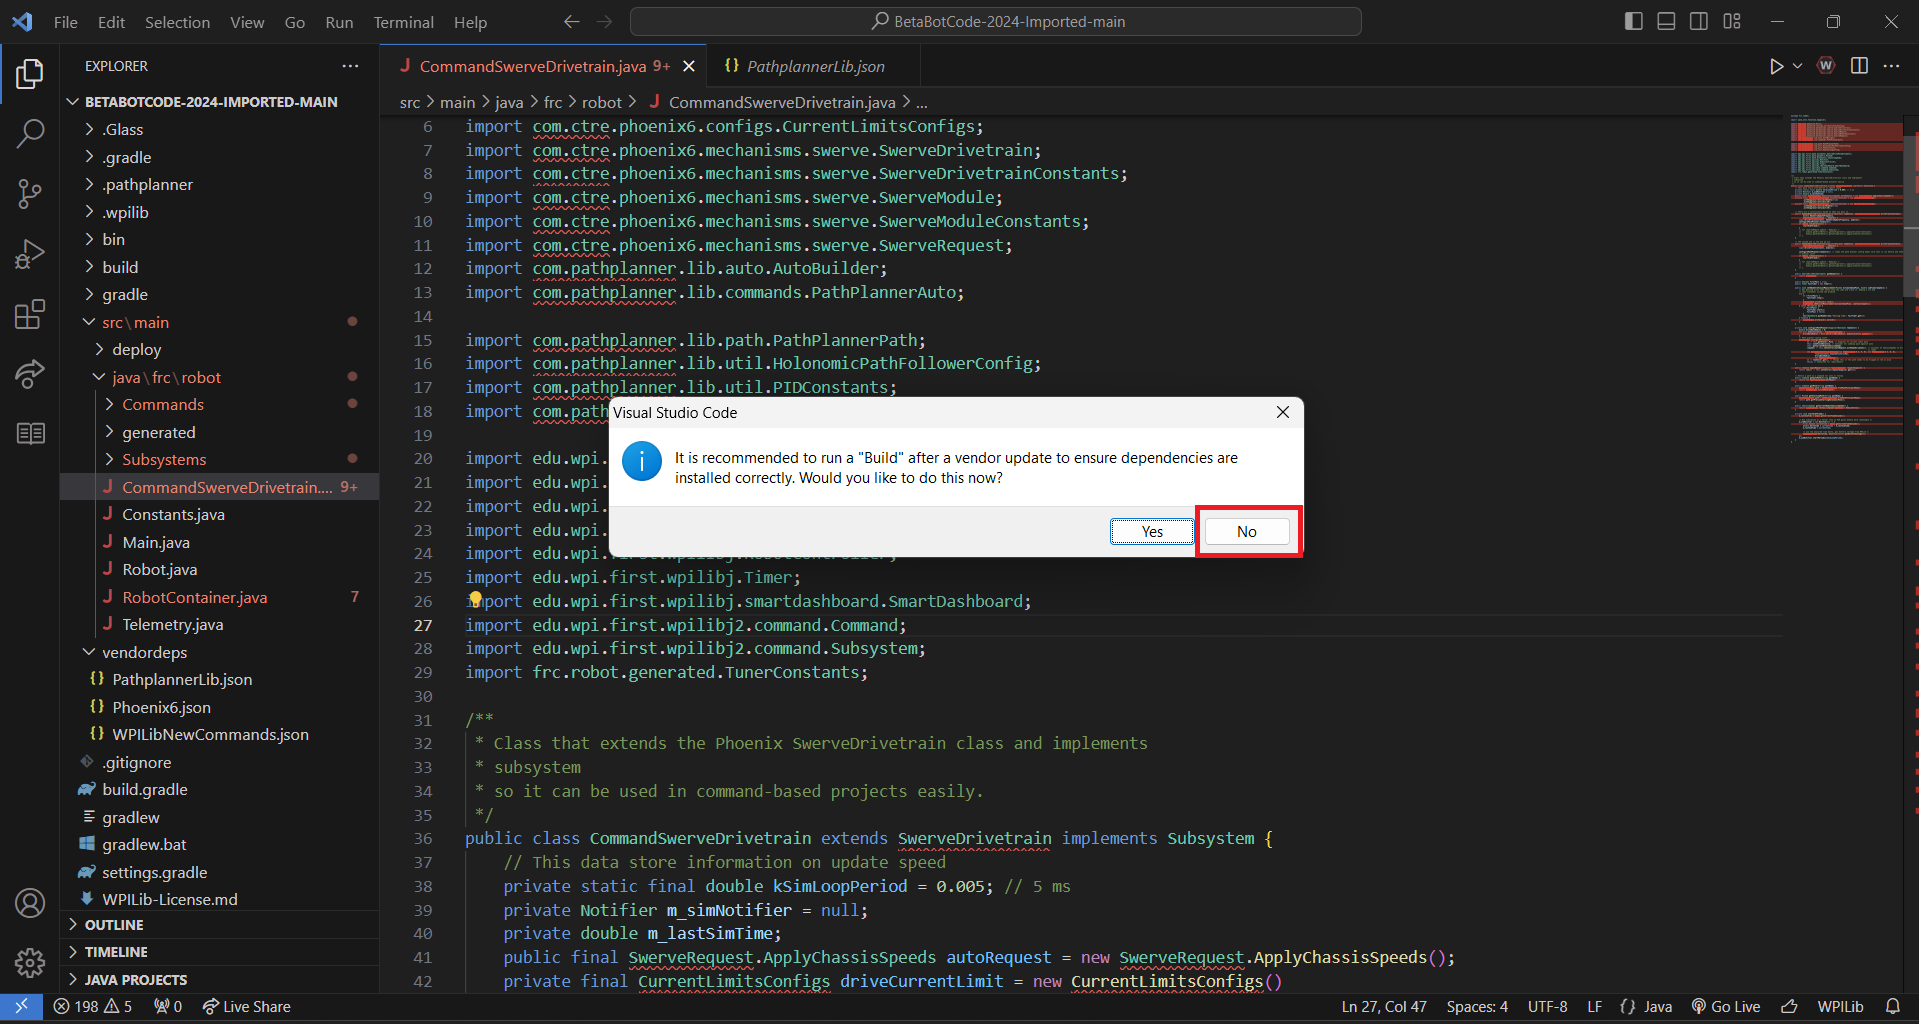
Now repeat these steps for the other 3 libaries.
Once finished open up you vendordeps folder and if you dont see 5 libaries installed install the missing.
If you do have all the libary hit the W button and search for Build Robot Code and click on it
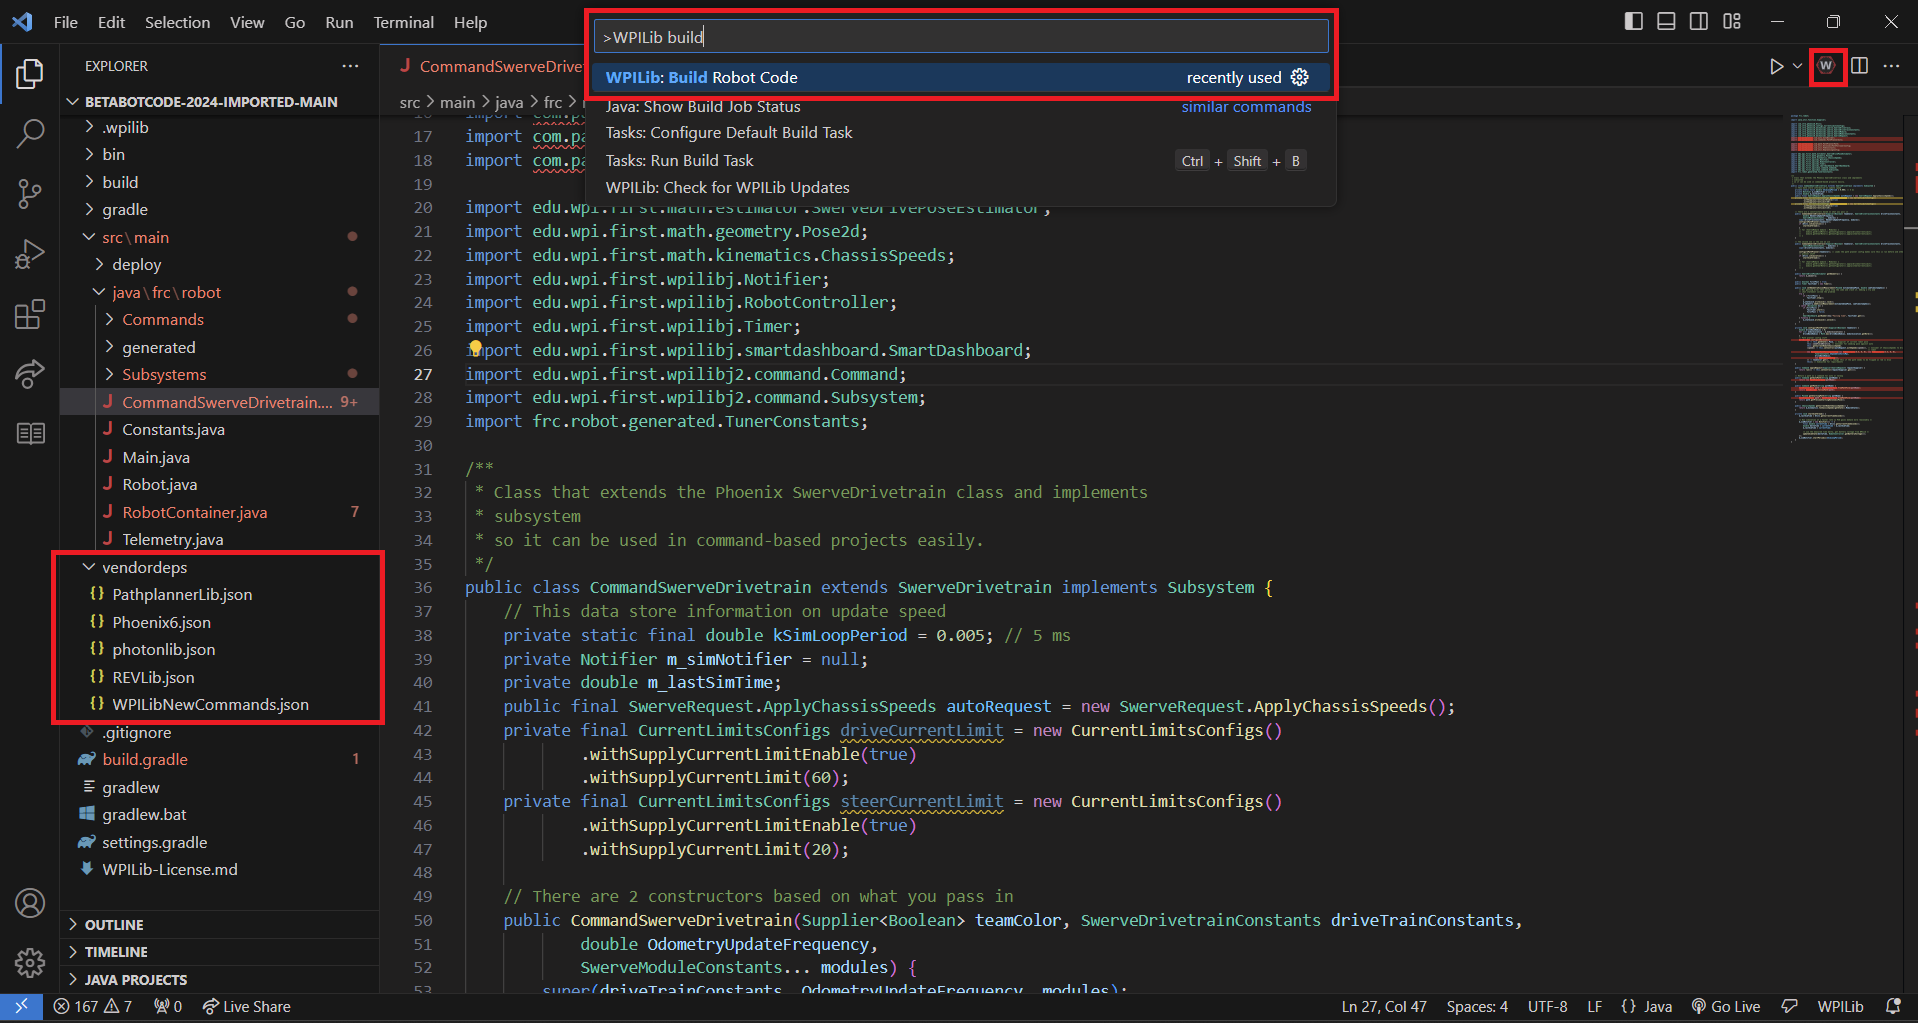
If you get Build Succcess you done and you can and you can move on to the next task. Though there might
be some error and if you see one of those follow the corresponding steps.
If it says one of the versions arent compatible with the version of WPILib
install the the correct version of WPILib or to find the newest version of the libary thats throwing the
error
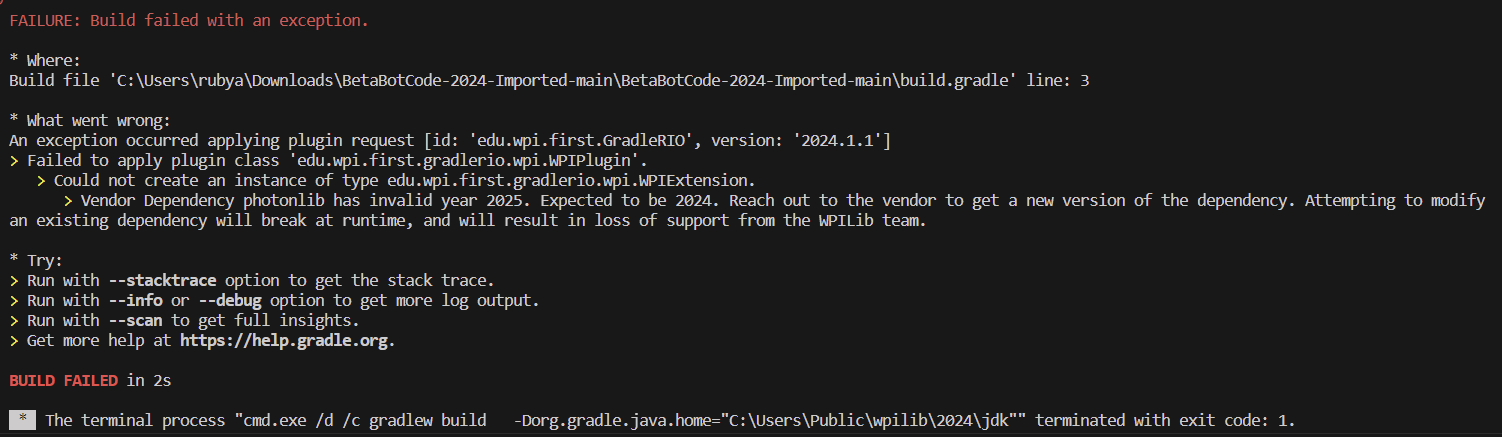
If you error instead something like this Could not find PathplannerLib-java-2024.2.3.jar
(com.pathplanner.lib:PathplannerLib-java:2024.2.3). for me it PathPlanner for you it might be Phoenix6
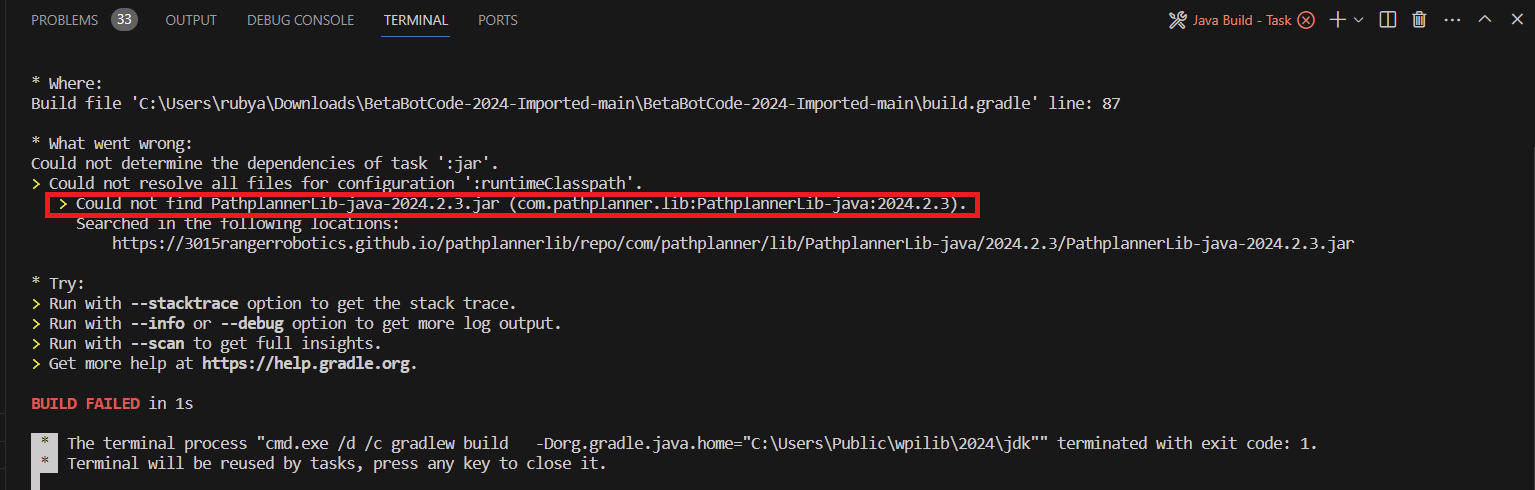
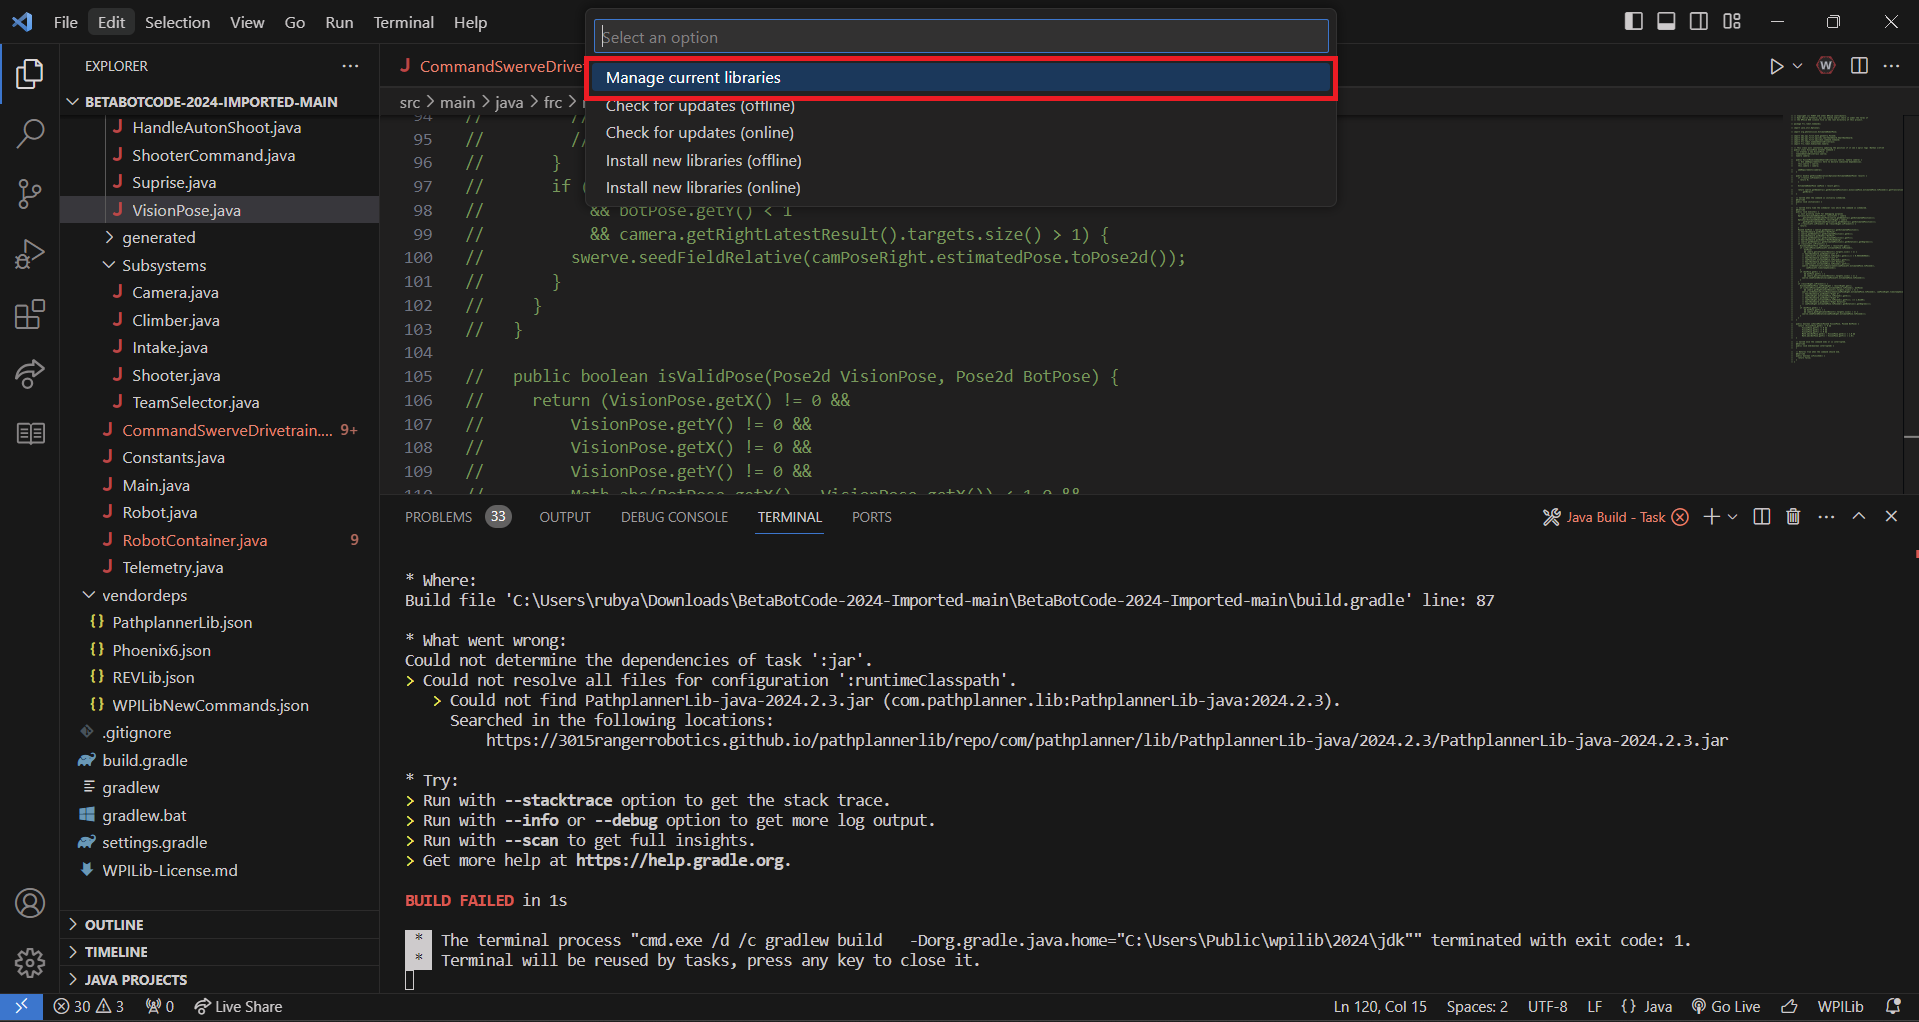
The solution is normally to just uninstall the libaries and reinstall it then try building the code
again. You this by click the W again and go to manage vendordeps again but instead click on manage current
libaries
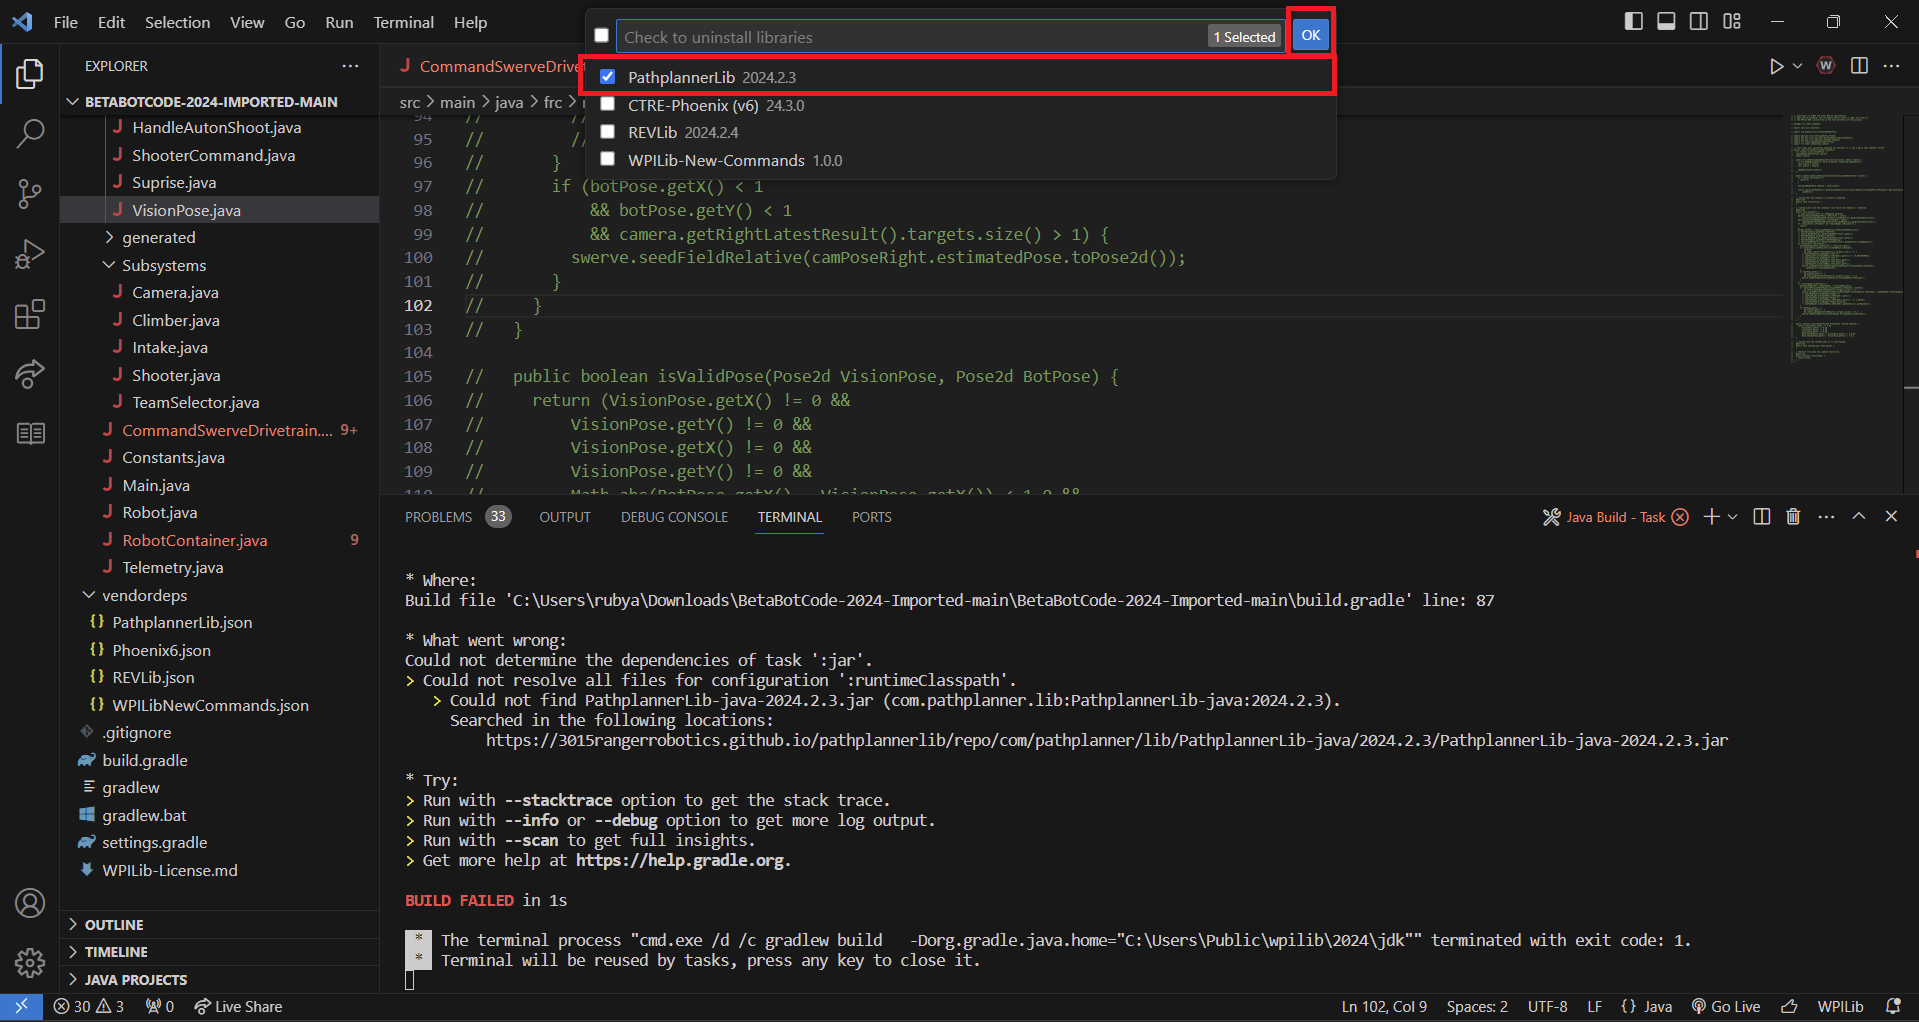
Now select the libary that is giving you the error then click okay and it will uninstall that libary.
Now repeat the step for that libary and see if it solves the issue if you still get an error go ask for
help.
How to Deploy Code
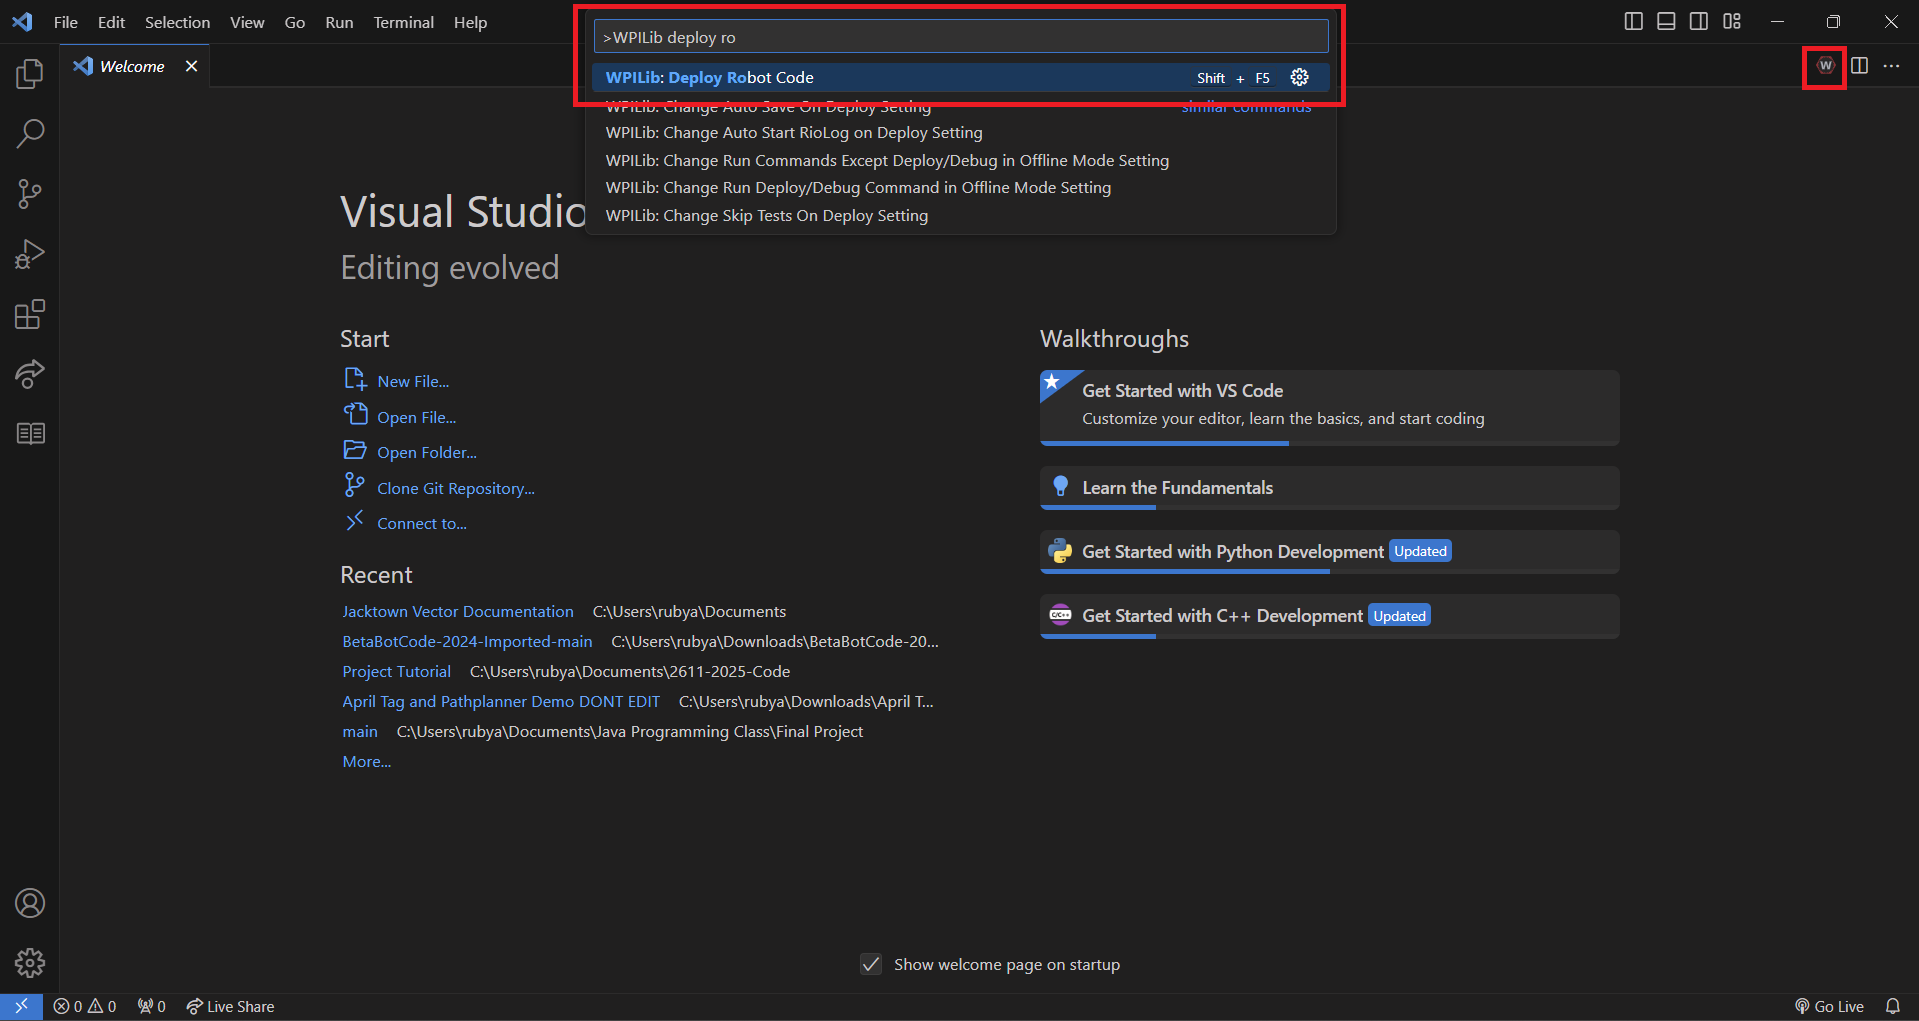
This part is really easy first connect to the robot via wifi and they locate the W button and search for
the deploy code and press deploy robot code
Variables
Variables are the computers way of storaging information and act as a container for different types of
information. In Java you must declare a variable with a specific data type and there two way of assigning
values to variables first is primitives.
Primitives:
|
int
|
represents integer numbers
|
|
double
|
represents decimals numbers
|
|
char
|
represent a single letter
|
|
boolean
|
true/false values
|
|
*String
|
represents text in code
|
While these are not the only primitives as there is also byte, short, long, and float these are the only
ones used in robotics and you only need to remember the ones listed above. Also String isn't technically a
primitive but it uses the same syntax as primitives so I include it.
The syntax for asigning variables of primitive types looks like this
type variableName = value;
Here are some examples:
int myNum = 5;
double myDecimalNum = 5.99;
char myLetter = 'D';
boolean myBool = true;
String myText = "Hello";
Next type of variable is called objects/classes and they need to be initialized and you do this by using
the key word "new"
MyClass myObject = new MyClass();
CANSparkMax motor = new CANSparkMax(0, MotorType.kBrushless);
DriveTrain drivetrain = new DriveTrain();
Command m_simpleAuto = new SimpleAuton();
UsbCamera camera = CameraServer.startAutomaticCapture("ShooterView",0);
Now for the last two you will notice something a little different, the first ones type and class don't
match this is due to a concept called inheritance which will be covered more under classes. For the next one you notice there is no key word new and you
can violate
this rule when calling a function that return the the corresponding datatype
Note
If all you want to do is declare a variable but not assign it any values you can do so by just doing
type variableName;
Using Variables
Now just defining and declaring variables wont actually do anything. There are two ways of using
variables depending on if it a primitive or a object for objects and classes it is more complicated and
will be covered more in the
classes section. For primitives though its simple and we'll start with
numbers.
Now just like in Math there are the four main operators addition(+), subtraction(-), multiplication(*),
and division(/). There is also a fifth one called the modulus(%) which will return the division remainder
Examples
int x = 5 * 2; // Equals 10
double y = 10 / 3; // Equals 1.3333
double z = 1.3 + 2.6; // Equals 3.9
int w = 3 - 10; // Equals -7
int remainder = 10 % 3; //Equals 1 since 10/3 has a remainder of 1
Note
Unlike in math where "=" mean that the left side is equal to the right this is not true in programming
it mean assigment which mean that that the left side is set to the right side
Now with this you can already to some complex things but for some task like incrementing it can be a
little tedious for example if you want to increase x by 1 you would have to write
x = x + 1;
So to make it easier there is what is called assigment operators and it just a simplification of the code
above.
x += 1;
| Operator |
Example |
Same As |
| += |
x += 5 |
x = x + 5 |
| ++ |
x++ |
x = x + 1 |
| -= |
x -= 3 |
x = x - 3 |
| -- |
x-- |
x = x - 1 |
| *= |
x *= 4 |
x = x * 4 |
| /= |
x /= 2 |
x = x / 2 |
| %= |
x %= 3 |
x = x % 3 |
There is also operators for comparing numbers this will be more important in the next unit
| Operator |
Name |
Example |
| == |
Equal to |
x == y |
| != |
Not equal |
x != y |
| > |
Greater than |
x > y |
| < |
Less than |
x < y |
| >= |
Greater than or equal to |
x >= y |
| <= |
Less than or equal to |
x <= y |
Congrats on making it to the end of the section hopefully I didn't lose you somewhere along the way. If
your confused about anything feel free to reach out and with that were on to conditional
Conditionals
A conditional is any code that require a condition to run. A condition is just a boolean which if you
remember from the variables sections is a true or false value. There are 7 total
conditionals in java that you need to remember
-
Use
if to specify a block of code to be executed, if a specified condition is true
-
Use
else to specify a block of code to be executed, if the same condition is false
-
Use
else if to specify a new condition to test, if the first condition is false
-
Use
switch to specify many alternative blocks of code to be executed
-
Use
while loop if you want a block of code to run as long as a specified condition is true
-
Use
do {} while loop if you want to execute the code block once, before checking if the
condition is true
-
Use
for loop when you know exactly how many times you want to loop through a block of code
While this may seem like a lot and it is but each one by itself isn't that hard aside maybe the
for loop and we'll being going over them one at a time
Note
A block of code is code that is contained with in curly brackets so this
{
// my code...
}
is a block of code
if statement:
As mention previously an if statement is when you only want some code to one once if and only if some
condition/boolean is true.
The syntax for this looks like this
if (condition) {
 //MyCode
}
Lets say we have a variable called armAngle and it can go between 0-90. If we want to increase the angle
how would we do this. You first thought after operators from the previous unit would just be to do
armAngle++;
Now this would work until the arm angle is 90 then we would want to stop incrementing so our condition
here is when the armAngle is equals to or less than 90 and we can write exactly that in a
if statement
if (armAngle < 90) {
 armAngle++
}
Now this code works and would be a working solution but in coding there is unusually more than one way of
doing something. The issue with the previous examples is what if the armAngle
was already above 90 if that happened it wouldn't solve our issues. So instead we can do
armAngle++
if (armAngle > 90) {
 armAngle = 90;
}
This perform the same logic as the other code but is better prepared for edge cases
Here another example this time with variables
int x = 20;
int y = 18;
if (x > y) {
 System.out.println("x is greater than y");
}
else statement:
This is is used when you have an either or scenario where you want one block of code to run when
something is true the other when its false. Here is the syntax
if (condition) {
 //WhenTrueCode
} else {
 //WhenFalseCode
}
Unlike an if statement which can be by itself you need to have a if to match
with an
else you cant just have an else by itself
Good example would be when pressing a button so let say I have two variables one is buttonA and the other
is wheelRPM and lets say when I press the button it set the wheelRPM to 3000 and then when I release it
sets it to zero
if (buttonA) {
 wheelRPM = 3000
} else {
 wheelRPM = 0;
}
if else statement:
This combines what we did in the previous two sections and allows you to chain multiple if statement
checks each one, one after another and if one of them is true it stop checking the other conditions. Here
is the syntax
if (condition1) {
 // block of code to be executed if condition1 is true
} else if (condition2) {
 // block of code to be executed if the condition1 is false and condition2 is true
} else {
 // block of code to be executed if the condition1 is false and condition2 is false
}
For these example I will take some code we used for our arm set points in 2023
if (Controller1.getStartButton()) {
 // home pos
 armSetPoint = 0.87
} else if (Controller1.getYButton()) {
 // high pos
 armSetPoint = 0.66
} else if (Controller1.getBButton()) {
 // medium  pos
 armSetPoint = 0.70
}  else if (Controller1.getAButton()) {
 // low pos
 armSetPoint = 0.80
} else if (Controller1.getXButton()) {
 // loading pos
 armSetPoint = 0.71
}
switch statement:
Now this one isn't used as often in robotics as we never used a switch stament in any of our code and it
kinda hard to explain so im just gonna skip straight to an example.
int day = 4;
switch (day) {
  case 1:
    System.out.println("Monday");
    break;
  case 2:
    System.out.println("Tuesday");
    break;
  case 3:
    System.out.println("Wednesday");
    break;
  case 4:
    System.out.println("Thursday");
    break;
  case 5:
    System.out.println("Friday");
    break;
  case 6:
    System.out.println("Saturday");
    break;
  case 7:
    System.out.println("Sunday");
    break;
}
// Outputs "Thursday" (day 4)
while loop
Up until now there was no way of running the same block of code as the only way to do this would be just
to copy and paste code a bunch of times. But this solution is solved using a while loop and it will run
the same block of code until the some condition is false. Here the syntax
while (condition) {
  // code block to be executed
}
Here an example
int i = 0;
while (i < 5) {
  System.out.println(i);
  i++;
}
Now we dont really every want to use while loop because the robot already has a regularly schedule loop
so if you add you own loop it can slow the code down and risk getting stuck in a infinite loop which is
bad
do while loop
Gonna be honest this is kinda useless but it still good to remember so I'll just include the syntax
do {
  // code block to be executed
}
while (condition);
for loop
Now this solves all the issues of the while loop as a for loop only loops
through code for a
certain amount of time and its great for looping through arrays (will add section for later) and for
running a code for only a set amount of times. Here the syntax
for (statement 1; statement 2; statement 3) {
  // code block to be executed
}
Statement 1 is executed (one time) before the execution of the code block.
Statement 2 defines the condition for executing the code block.
Statement 3 is executed (every time) after the code block has been executed.
Here an Example that loops through a code 5 times
for (int i = 0; i < 5; i++) {
  System.out.println(i);
}
I admit that the loop section of conditionals was a little short and that was due to the fact that we
don't use
loops that often in robotics but they are usefull when programming other things so I encourage you to
learn more if your interested.
Now I know this unit was a lot with the amount of material that was covered and while the next one won't
be as long it will be more complicated and the units will get more difficult so I encourage you to re
read these two units and get a good understand before moving ahead
Functions
Functions are useful in programming as it allows you to bundle the code you wrote into one neat little
package. You use function by calling them and pass values know as parameters if neccessary.
Note
I refer to them as functions but you will also see them be called methods and they mean the same things
so don't get confused if you see them used interchangeably.
Now the syntax for function is relatively simple and is the same for all of them with no exceptions like
in some of the other units
returnType name(parameter1, parameter2,... parmaterN) {
  // code to be executed
}
Just cause there is not much there doesnt mean it isn't complex so I will breaking down each
part one at a time
Return Type
Now just as the name suggest its the data type that the function returns and as learned in the variables tabs this include all the primitives and the different objects. But for
return type there is one extra type and that is if you don't want to return anything and we use the
word void
Here and example of how you would use the void return type
void myMethod() {
  // code to be executed
}
When you want to return a values use the keyword return and you must always return that
type or it will throw and error. Here is an example of how NOT to write a return code
int getX() {
  if (x > 0) {
    return x;
  }
}
The issue with this is that if x isn't greater than zero than you could end up returning nothing which
would
mean its a return type of void but you told the computer it was meant to return a int so it will throw an
error. Here would be a corrected version
int getX() {
  if (x > 0) {
    return x;
  } else {
    return 0
  }
}
Function Parameters
For parameters you can have 0 or 100 parameters. They go inside the parentheses and you need to define
what type of data is getting passed in and then give it a names so you can use it inside the function.
For this example lets say we want it to return your name and the variables you would need to pass in is
your
first and last name. Also to create a parameter you just type its name then a comma if you want to include
more
String name = getName("Nathan", "Blondke");
String getName(String fname, String lname) {
  // You can add strings btw by using the + so "ab" + "ba" = "abba"
  return fname + " " + lname;
}
Also notice that the function was created after it was used and this is perfectly fine and is usually
preferred.
A common scenario where we create functions when we want a function to set power to a motor
CANSparkMax climbLeftMotor = new CANSparkMax(62, MotorType.kBrushless);
public void setLeftClimb(double power){
  climbLeftMotor.set(power);
}
You can also use function to help simplify math equations into one word so I will pick a simple equation
of just x + y
= z which is just adding
double add(double x, double y) {
  return x + y;
}
This was a relatively short unit and I will probably add more stuff later but functions are hard to
explaing without just giving example so if you have any suggest feel free to do so
Classes
Now we can final start writing actual programs as up until this point the code I demostrated so far could
not be run by themselves as java is a language built around and design with classes in mind.
First things to note is when creating a file you need to make sure that your file name and you class name
our the exact same this includes capitals. There are also many type of way of making a class but I will
first just give you the syntax for just a empty class.
public class name {
  // code to be executed
}
Note
Now technically you dont need the word public to create a class but there is never a
time in robotics you wouldn't put public in the front also these are called modifiers and
will be mention more under scope further down in this unit
Now classes can only store three thing attributes (just variables), methods (just functions), and a
constructor (optional but usually wanted). For the rest of the example I will make it so you can run the
example code and follow along. So first
open up WPILib VS Code and create a file called Point.java To run a java file you can click this button in
the top right

public class Point {
  int x = 5;
  int y = 3;
}
If you try running the code nothing is going to happen that is because class can't do anything by
themselves so you have to create a object using that class. You can go to the variables unit if you forgot how to do that. Now I gonna be using the main function
which looks like
public static void main(String[] args) {
  // Code ran by compiler
}
Don't ever you use a main function when programming on the robot but for this test its fine. Also even
though I gonna put main inside different classes its not actually part of the class and just imagine this
function as
code outside everything.
public class Point {
  int x = 5;
  int y = 3;
  public static void main(String[] args) {
    Point myPoint = new Point();
  }
}
Now that we finally created a object using a class we made we know need to learn how to use stuff in a
class. You do this my using what called dot notation and can access stuff inside a class by doing
name.stuffToAccess
So if we wanted to print our x and y values to the terminal we would write
public class Point {
  int x = 5;
  int y = 3;
  public static void main(String[] args) {
    Point myPoint = new Point();
    System.out.println(myPoint.x);
    System.out.println(myPoint.y);

    //Just like variables you can also change values of attributes
    myPoint.x = 1;
    myPoint.y = -5;

    System.out.println(myPoint.x);
    System.out.println(myPoint.y);
  }
}
Normally acces variables like this inside a object is generally bad practice so instead you might want to
create a method or function inside the class to get certain values.
public class Point {
  int x = 5;
  int y = 3;
  public int getX() {
    return x;
  }
  public int getY() {
    return y;
  }
  public static void main(String[] args) {
    Point myPoint = new Point();
    System.out.println(myPoint.getX());
    System.out.println(myPoint.getY());
  }
}
Now we lost the ability to change our variables so we would need to create two more methods for that.
public class Point {
  int x = 5;
  int y = 3;
  public int getX() {
    return x;
  }
  public int getY() {
    return y;
  }
  public int setX(int x) {
    this.x = x;
  }
  public int setY(int y) {
    this.y = y;
  }
  public static void main(String[] args) {
    Point myPoint = new Point();
    System.out.println(myPoint.getX());
    System.out.println(myPoint.getY());

    myPoint.setX(1);
    myPoint.setY(-5);

    System.out.println(myPoint.x);
    System.out.println(myPoint.y);
  }
}
Note
The this keyword is used when refering to variable of the same name but have different
scope (will go over later). The this keyword only works on
attributes.
Now we just created what is called getters and setters and they come up a lot in java. There is still one
limiting thing about our point class and that is that our x and y have to start at 5 and 3. Though similar
to how function have parameters, classes also have parameters and they can be used to customize objects
even if they have the same class. This is done by creating what called a constructor and this has to have
the same name as the class and is called when you first initialize the object
public class Point {
  int x;
  int y;
  public Point(int x, int y) {
    this.x = x;
    this.y = y;
  }
  public int getX() {
    return x;
  }
  public int getY() {
    return y;
  }
  public static void main(String[] args) {
    Point myPoint = new Point(5, 3);
    System.out.println(myPoint.getX());
    System.out.println(myPoint.getY());
  }
}
Couple things of notes is that for constructor you dont include a return type. Also if you want to create
a Point object you must specify a x and a y. If you still wanted to have a default x and y you could do
that my creating a second constructor that doesn't require any parameters and just set it to what ever
values you want. This is a concept called Method Overloading and I leave it as an exercise for the reader
to learn more about that.
Scope
Before I continue and talk about Inheritance and static methods and attributes I need to take a small
detour to talk about scope and the different modifiers you can use. In Java, variables are only accessible
inside the region they are created. This is called scope. This is the text book
definition and a more long winded explaination is. Variables declared inside blocks of code are only
accessible by the code between the curly braces, which follows the line in which the variable was
declared
Example:
public class Main {
  public static void main(String[] args) {

    // Code here CANNOT use x or y
    int y = 50;
    { // This is a block

      // Code here CANNOT use x but CAN use y

      int x = 100;

      // Code here CAN use x and y
      System.out.println(x);

    } // The block ends here

  // Code here CANNOT use x but CAN use y

  }
}
Note
Noramlly a block of code isn't just by itself and is instead belong to an if, while or for statement.
Also variables defined inside the paramateters are also with in the scope of the block of code
Modifiers
Modifiers are used set the access level for classes, attributes, methods and constructors. There are two
types one is Access Modifiers which controls the access level and Non-Access Modifiers which do not
control
access level, but provides other functionality. They go in the
very front and you can sometimes chain them together like here
public static final double NathanSpeed = 2.0;
Access Modifiers
For classes, you can use either use public or leave it blank:
| Modifier |
Description |
| public |
This allows the class to be accessible by other classes in different files |
| nothing |
The class is only accessible by classes in the same package. Dont ever do this. |
For attributes, methods and constructors, you can use the one of the following:
| Modifier |
Description |
| public |
The code is accessible by other classes in different files |
| private |
The code is only accessible within the declared class and no other files |
| nothing |
The code is only accessible by classes in the same package. Dont ever do this. |
| protected |
The code is accessible in the same package and subclasses. You will learn more about
subclasses and superclasses in the Inheritance chapter. (never used this before you dont have to
remember this) |
Non-Access Modifiers
For classes, you can use either final or abstract:
| Modifier |
Description |
| final |
The class cannot be inherited by other classes (will learn about later) |
| abstract |
The class cannot be used to create objects and must be inherited to use |
For attributes and methods, you can use the one of the following:
| Modifier |
Description |
| final |
Attributes and methods cannot be overridden/modified |
| static |
Attributes and methods belongs to the class, rather than an object |
Note
There is also abstract, transient, synchronized, and volatile but we dont use these so I didn't
feel the need to include them
Java Inheritance (Subclass and Superclass)
We have finally arrived to the last unit of Java basic and this is very important as we inherited a class
often from WPILib lwhen creating Commands and Subsystems. In Java you can inherit attributes and methods
from one class to another. There are two forms of classes when inheriting
- subclass (child) - the class that inherits from another class
- superclass (parent) - the class being inherited from
To inherit from a class, use the extends keyword
Example:
class Vehicle {
  protected String brand = "Ford";        // Vehicle attribute
  public void honk() {                    // Vehicle method
    System.out.println("Tuut, tuut!");
  }
}

class Car extends Vehicle {
  private String modelName = "Mustang";    // Car attribute
  public static void main(String[] args) {

    // Create a myCar object
    Car myCar = new Car();

    // Call the honk() method (from the Vehicle class) on the myCar object
    myCar.honk();

    // Display the value of the brand attribute (from the Vehicle class) and the value of the modelName from the Car class
    System.out.println(myCar.brand + " " + myCar.modelName);
  }
}
Congrats you reach the end of the section and once again if you notice any grammar errors or feel like
there stuff that could be added to make things more clear don't be afraid to reach and tell me.
Double checking Electrical
When looking at the different devices you will see different colors blinking and these are called status
lights and they give visual feedback to us to tell us if anything is wrong with the hardware. This
information I got from there website if you want to know where I got this information or if want to learn
more https://v6.docs.ctr-electronics.com/en/stable/docs/hardware-reference/talonfx/
Motors
Status Light Reference
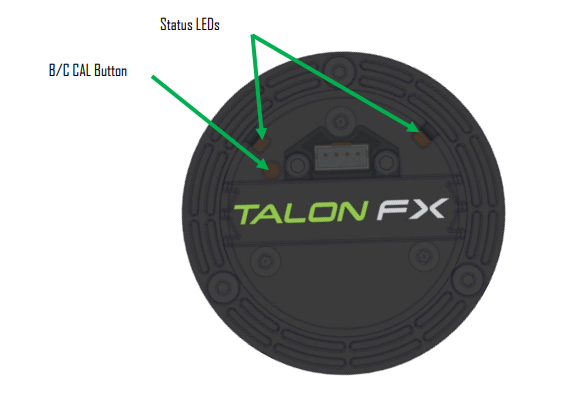
| Blink Codes |
| Disabled Codes |
| Animation (Click to play) |
LED State |
Cause |
Possible Fix |
|
|
LEDs Off |
No Power |
Provide 12V to Red/Black leads. |
|
|
Blinking Alternating Red |
Talon FX does not have a valid CAN/PWM signal. |
Ensure good connections between CANH and CANL (Yellow and Green) & robot controller is on.
|
|
|
Blinking Alternating Orange |
TalonFX detects CAN but does not see Phoenix running on the robot controller. |
If Phoenix is running on the robot controller, ensure good connection between the controller and
this device. Otherwise, deploy a robot program that uses Phoenix. |
|
|
Blinking Simultaneous Orange |
Talon FX has valid CAN signal and is disabled. Phoenix is running in robot controller and
Talon FX has good CAN connection to robot controller. |
If robot is enabled, ensure a control request is being sent to the Talon FX. |
| Enabled Codes |
|
|
Both Solid Orange |
Talon FX enabled with neutral output. |
|
|
Blinking Simultaneous Red |
Talon FX driving in reverse. Rate of blink corresponds to duty cycle applied. |
|
|
Blinking Simultaneous Green |
Talon FX driving forward. Rate of blink corresponds to duty cycle applied. |
|
|
Offset Alternating Red/Off |
Talon FX limited (hard or soft limit). Direction of offset determines
forward/reverse limit. |
| Special Codes |
|
|
Offset Orange/Off |
Talon FX in thermal cutoff. |
Allow Talon FX to cool. Consider configuring Stator Current Limits to reduce heat generation.
|
|
|
Alternate Red/Green |
Talon FX driven with Pro-only command while unlicensed. |
Use non-Pro-only command, or license device for Pro. |
|
|
Alternate Red/Orange |
Damaged Hardware. |
Contact CTRE. |
|
|
Single LED alternates Green/Orange |
Talon FX in bootloader. |
Field-upgrade device in Tuner X. |
Pigeon 2.0
Status Light Reference
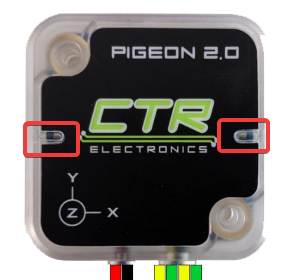
| Blink Codes |
| Animation (Click to play) |
LED State |
Cause |
Possible Fix |
|
|
LEDs Off |
No Power |
Provide 12V to Red/Black leads. |
|
|
Blinking Alternating Red |
Pigeon 2 does not have valid CAN. |
Ensure good connections between CANH and CANL (Yellow and Green) & robot controller is on.
|
|
|
Blinking Alternating Orange |
Pigeon 2 detects CAN but does not see Phoenix running on the robot controller. |
If Phoenix is running on the robot controller, ensure good connection between the controller and
this device. Otherwise, deploy a robot program that uses Phoenix. |
|
|
Blinking Simultaneous Orange |
Pigeon 2 detects CAN and sees the robot is disabled. Phoenix is running in robot
controller and Pigeon 2 has good CAN connection to robot controller. |
|
|
Blinking Alternating Green |
Pigeon 2 detects CAN and sees the robot is enabled. |
|
|
Alternate Red/Orange |
Damaged Hardware. |
Contact CTRE. |
|
|
Single LED alternates Green/Orange |
Pigeon 2 in bootloader. |
Field-upgrade device in Tuner X. |
CANcoder
| Blink Codes |
| Animation (Click to play) |
LED State |
Cause |
Possible Fix |
|
|
LED Off |
No Power |
Provide 12V to Red/Black leads. |
|
|
Slow Bright Red |
CANcoder does not have valid CAN. |
Ensure good connections between CANH and CANL (Yellow and Green) & robot controller is on.
|
|
|
Rapid Dim Red |
CAN bus never detected since boot, CANcoder now reporting strength of magnet. Magnet is out of
range (<25 mT or > 135 mT) |
Ensure good connections between CANH and CANL (Yellow and Green) & robot controller is on.
Additionally, ensure the magnet's center axis is aligned with the defined center of the CANcoder
housing and the magnet is in range of the CANcoder. See Section 2.1 of the Hardware User Manual.
|
|
|
Rapid Dim Orange |
CAN bus never detected since boot, CANcoder now reporting strength of magnet. Magnet is in range
with slightly reduced accuracy (25-45 mT or 75-135 mT). |
Ensure good connections between CANH and CANL (Yellow and Green) & robot controller is on.
Additionally, ensure the magnet's center axis is aligned with the defined center of the CANcoder
housing and the CANcoder is not too close or too far from the magnet. See Section 2.1 of the
Hardware User Manual. |
|
|
Rapid Dim Green |
CAN bus never detected since boot, CANcoder now reporting strength of magnet. Magnet is in
range. |
Ensure good connections between CANH and CANL (Yellow and Green) & robot controller is on.
|
|
|
Rapid Bright Red |
CAN bus healthy. Magnet is out of range (<25 mT or > 135 mT) |
Ensure the magnet's center axis is aligned with the defined center of the CANcoder housing and
the magnet is in range of the CANcoder. See Section 2.1 of the Hardware User Manual. |
|
|
Rapid Bright Orange |
CAN bus healthy. Magnet is in range with slightly reduced accuracy (25-45 mT or 75-135 mT). |
Ensure the magnet's center axis is aligned with the defined center of the CANcoder housing and
the CANcoder is not too close or too far from the magnet. See Section 2.1 of the Hardware User
Manual. |
|
|
Rapid Bright Green |
CAN bus healthy. Magnet is in range. |
|
|
Alternate Red/Orange |
Damaged Hardware. |
Contact CTRE. |
|
|
Alternate Orange/Green |
CANcoder in bootloader. |
Field-upgrade device in Tuner X. |
Now if all of the decives our blinking the correct color you can now move on to the next step.
Updating the Hardware
This section will tell you how to connect to Tuner X and update and license for all CTRE decives.
Warning
Make sure you update the RoboRIO before do any of these steps while it not mandatory to update the
RoboRIO it is highly encourage to get it out of the way first.
Danger
Make sure you have the most up to date version of TunerX if you don't do this nothing is going to
work. This is where the version is located after opening the app in this example it for 2024 but for
you it should be 2025 or whatever the current year is

Now begin by opening up the TunerX app and you then need to CONNECT TO THE ROBOT and input 2611 in the
spot outline by a red box
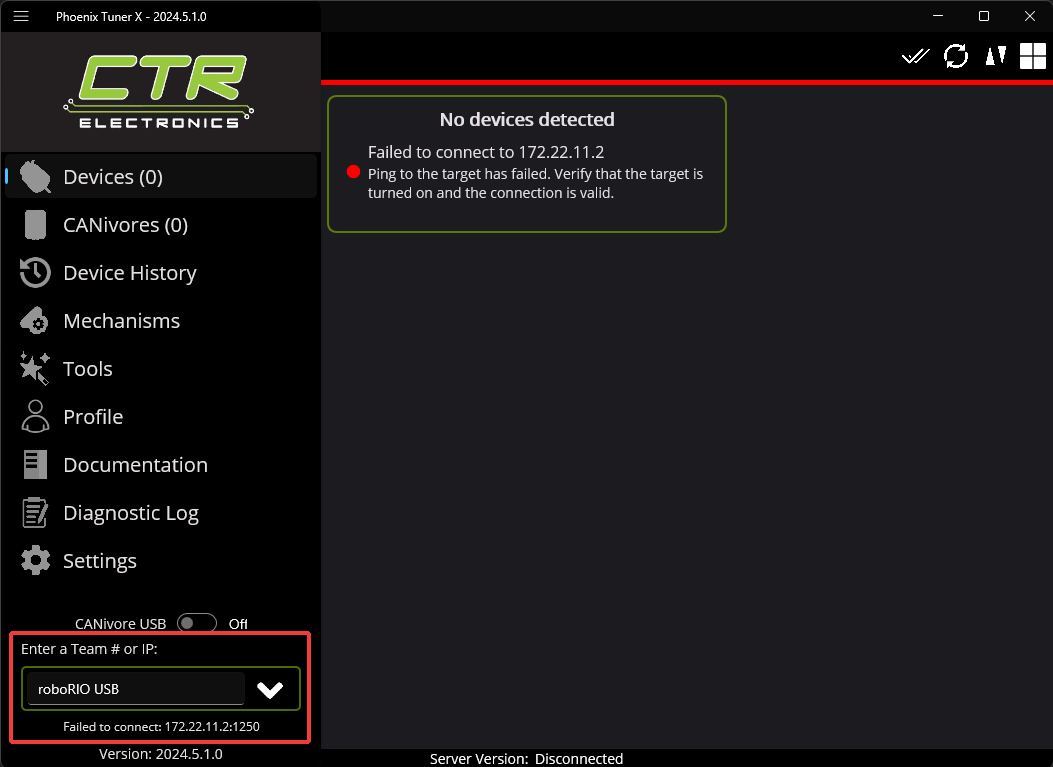
Now click on the decives tab and you should see a page that looks like this
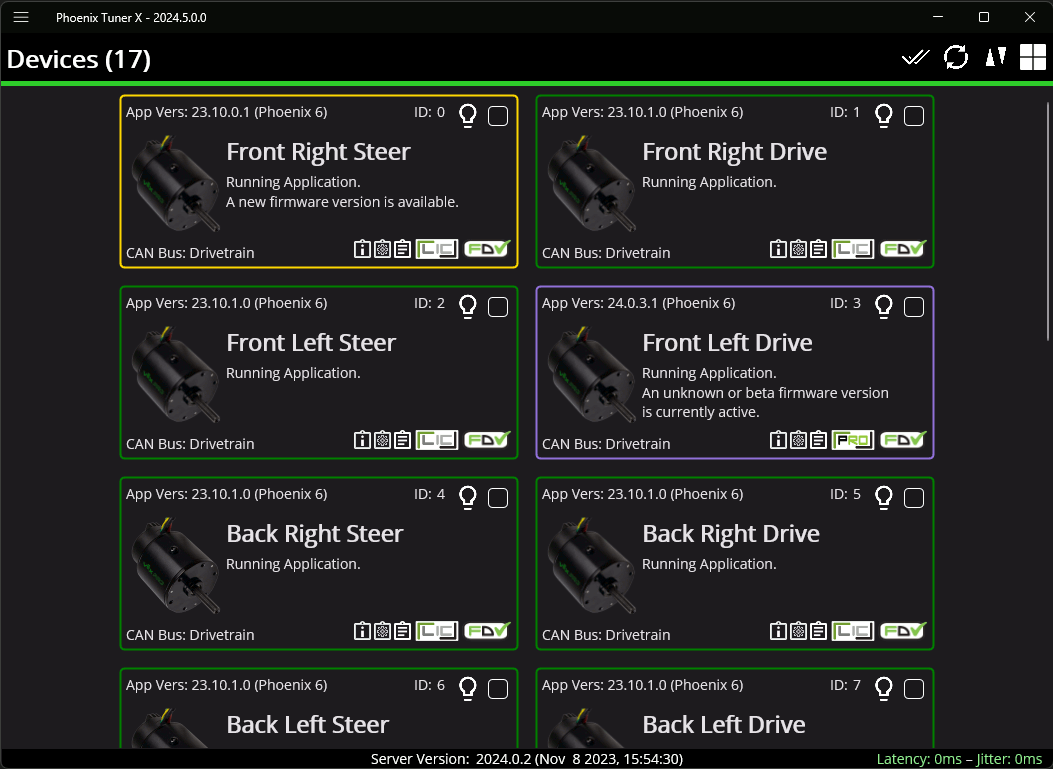
Now you will see that the decives that have different color surrounding them and they are called Card
Colors
Card Colors
|
Color
|
Description
|
|
Green
|
Device has latest firmware.
|
|
Purple
|
Device has an unexpected/beta firmware version.
|
|
Yellow
|
A new firmware version is available. Check the
changelog to determine if the new version
matters to your application
|
|
Red
|
Device has a duplicate ID.
|
|
Blue
|
Failed to retrieve list of available firmware.
|
Warning
Now your decives should either be Yellow or Green and sometimes Purple if you get something else go
seek mentor help.
Now select all the decives that aren't green by click the check box. Then click on the arrow it is Label
with 2 ignore the button label 1.
You will then get a screen that pops up and you will need to select the current year in the top left and
the click Update to latest
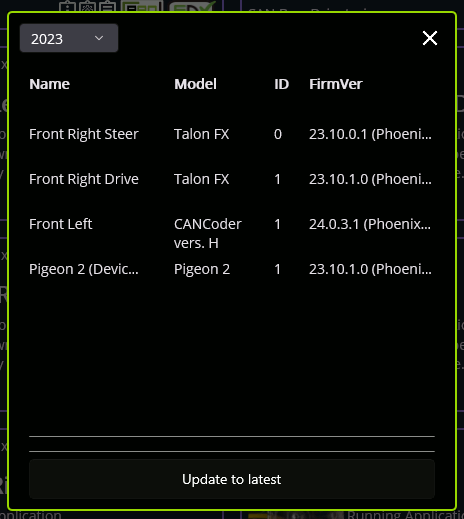
At some point you might get a screen that look kinda like the one below and if you get that then select
the most recent version in the drop down
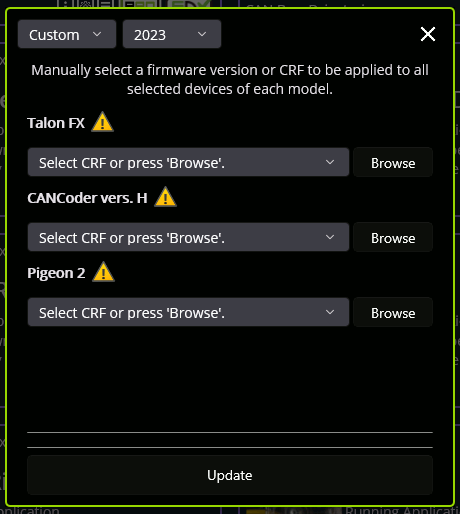
Now if all you decives are green you can now move on (You may need to license things if they are new
devices)
Generate Tuner Constants
Now currently documentation is out dated is some area but here is the link to the website
https://v6.docs.ctr-electronics.com/en/2024/docs/tuner/tuner-swerve/index.html
But it is pretty similiar. Also Wheel Radius is 2.0 Inches our FL to FR distance is 20.75 FL to BL is
20.75.
Module type is Mk4i and were using the L2 14T (Your gear ratio is probably different triple check this).
These could change but hopefule this helps. Also at the very
end your will have the option to build project or Tuner Constants only choose Tuner Constants only
Danger
Make sure you have the most up to date version of TunerX if you don't do this nothing is going to
work. This is where the version is located after opening the app in this example it for 2024 but for
you it should be 2025 or whatever the current year is
Getting AdvantageKit Working
First go to the page https://github.com/Mechanical-Advantage/AdvantageKit/releases/
and look for the most recent version and then download the
AdvantageKit_TalonFXSwerveTemplate.zip
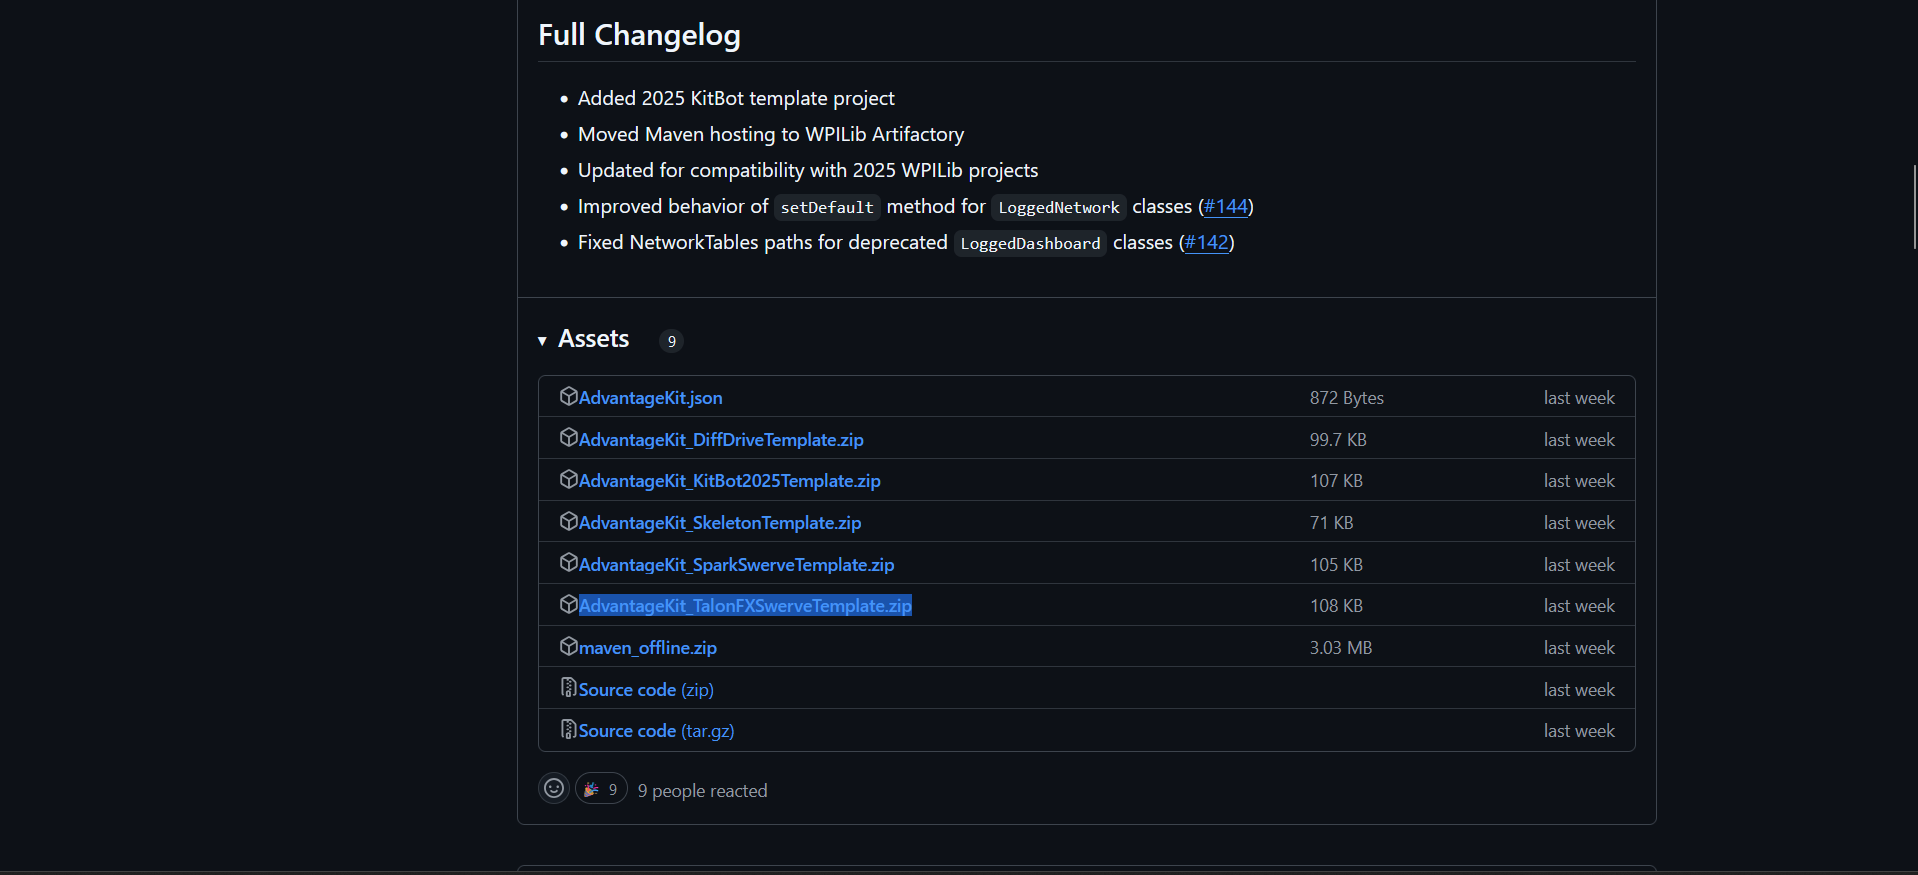
Unzip the folder and then go to src/main/java/frc/robot/generated/TunerConstants.java and replace
this file with the values you got from TunerX
Odometry/Swerve
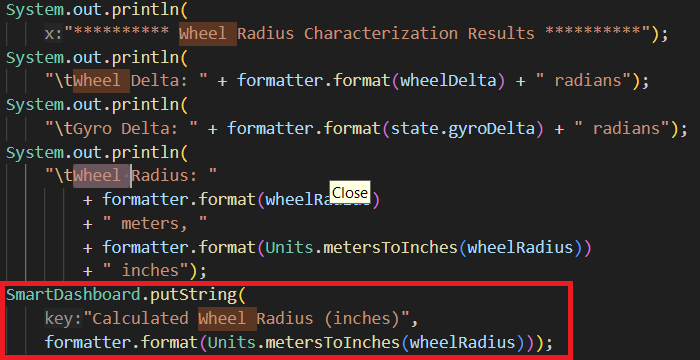
Q: I am running the Drive Simple FF Characterization or Drive Wheel Radius
Characterization and I don't know where the calculated values are?
A: This is because the values are outputted to the default Java console/terminal and not to the normal
Smartdashboard or Advantage Scope so don't waste your time trying to look for it and just add these lines
of code to the DriveCommands.java file. The added code is outlines in red btw

Q: I ran the Drive Wheel Radius Characterization and got a value greater than 2
inches which makes no sense?
A: If you get a small value like 2.01, it’s probably not a big concern. However, if you get a higher
number
like 2.1 or 2.2, that’s an issue. The solution we found was that both our FL to FR and FL to BL
measurements were rounded to 20.5 when the actual value was 20.75. Additionally, our module used L2+ or L2
16T for Tuner X, but we mistakenly used the normal L2, which does not have the same gear ratio.
Q: I double-checked all the swerve values, and I am still getting a massive error,
but it is consistently off by the same amount?
A: If you are using Colsons, this is a known issue and its due to the way they interact with the nap of
the carpet,
producing different errors. You can solve this by using vision or compensating for it in the code.
Vision
Q: We just arrived at the competition, and the cameras are suddenly fuzzy, even
though the focus didn't change?
A: This is a common occurrence with cameras if they sit in a cold truck overnight and are then brought
into a warm environment like a gym. This is due to condensation, where small water droplets affect the
camera's vision. The best plan is to wait a couple of hours for it to naturally clear. To speed up the
process, you can use a hair dryer, but be careful not to set it too high, as excessive heat can damage the
camera. According to best practices found online, sealing your camera in an airtight bag beforehand can
help prevent condensation.
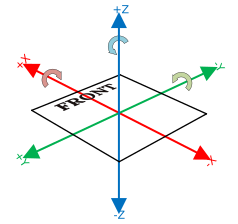
Q: How to I find the camera to robot transform?
A: You can go to read more information on https://docs.wpilib.org/en/stable/docs/software/basic-programming/coordinate-system.html
or this image should help a lot. For the rotation the arrows point which way is positive and the x, y, z, corresponds to roll, pitch, yaw.
Path Planner
Q: Why is the bot always lagging behind the target position?
A: First, make sure you pull up AdvantageScope or the PathPlanner Telemetry tab to check if it’s an
odometry
issue. Then, double-check that your drive PID is finely tuned, as running an untuned bot for a path can
cause this expected behavior. This should almost completely eliminate your issues, but if it’s still off
by an inch or so, try tuning the PathPlanner PID. However, this should be the final thing you adjust.
Motors
Q: I wrote simple code to move a motor but it moves than drops even though I keep
holding the joystick?
A: This is a relatively common issue, and it has wasted a lot of time thinking it was a code issue when,
in
reality, it was just loose wiring. First, double-check all the CAN connections to see if any are loose. If
all your wiring is secure but the issue persists, check your Anderson connectors. These can be deceiving
because they may look secure, and even when you tug on them, they still appear fine. However, when you
unplug the Anderson connectors and perform a tug test, they might come right off.
General Mechanisms
Q: How do I know what way the motor is going to spin when I give it a posive
value?
A: By default Clockwise is the positive direction but be careful as if there is a gear connected than
positive will spin Counter Clockwise